Welcome to the second article of our deep dive, designed to help you learn all you need to enjoy flight simulation and Microsoft Flight Simulator.
If you have already read our introduction, you know that for the moment, we’re focusing on Microsoft Flight Simulator, as it’s the easiest entry point into the genre. In due course, we’ll touch on other simulators like DCS World and X-Plane 12.
For now, we’ll be taking a look at how to enrich your experience of the simulator by purchasing add-ons (or finding them for free) and installing them.
If you’re unfamiliar with add-ons, think of them as DLC. The largest difference with your usual DLC is that they aren’t necessarily made or even published by Microsoft, but a wide variety of developers create and distribute them.
They include new aircraft, new scenery (airports, cities, landmarks, and more), activities, liveries, or even utilities to improve your flight simulation experience.
There is also various places where you can find add-ons, starting with:
The Official Marketplace
Microsoft provides an official marketplace within the simulator where you can buy and install various add-ons directly.
Like every option, it has pros and cons. On one hand, it’s the fastest and easiest way to get some add-ons for novices who may not know where to look. It also has a rating system that lets you get a very rough idea of the quality of an add-on. Do keep in mind, however, that this kind of rating system always 100% reliable.
You will also find some add-ons that are available exclusively on the marketplace, which include those published by Microsoft itself.
On the other hand, you will find that some developers can’t or don’t want to publish their products on the marketplace and some some advanced add-ons also require external programs to run alongside the simulator and the marketplace doesn’t support them.
You also will find that you have less control over the add-ons installed, and updates are usually received later than other stores, as they need to go through an induction process at Microsoft before they are published.
Another downside of the official marketplace is that Microsoft’s rules absolutely forbid any form of cosmetic weaponry displayed on an add-on. This doesn’t just involve aircraft, which won’t get the option to carry missiles or guns, but also any form of military scenery.
You can gain access to marketplace via the “Marketplace” option in the main menu. Once inside, you will see the following screen.
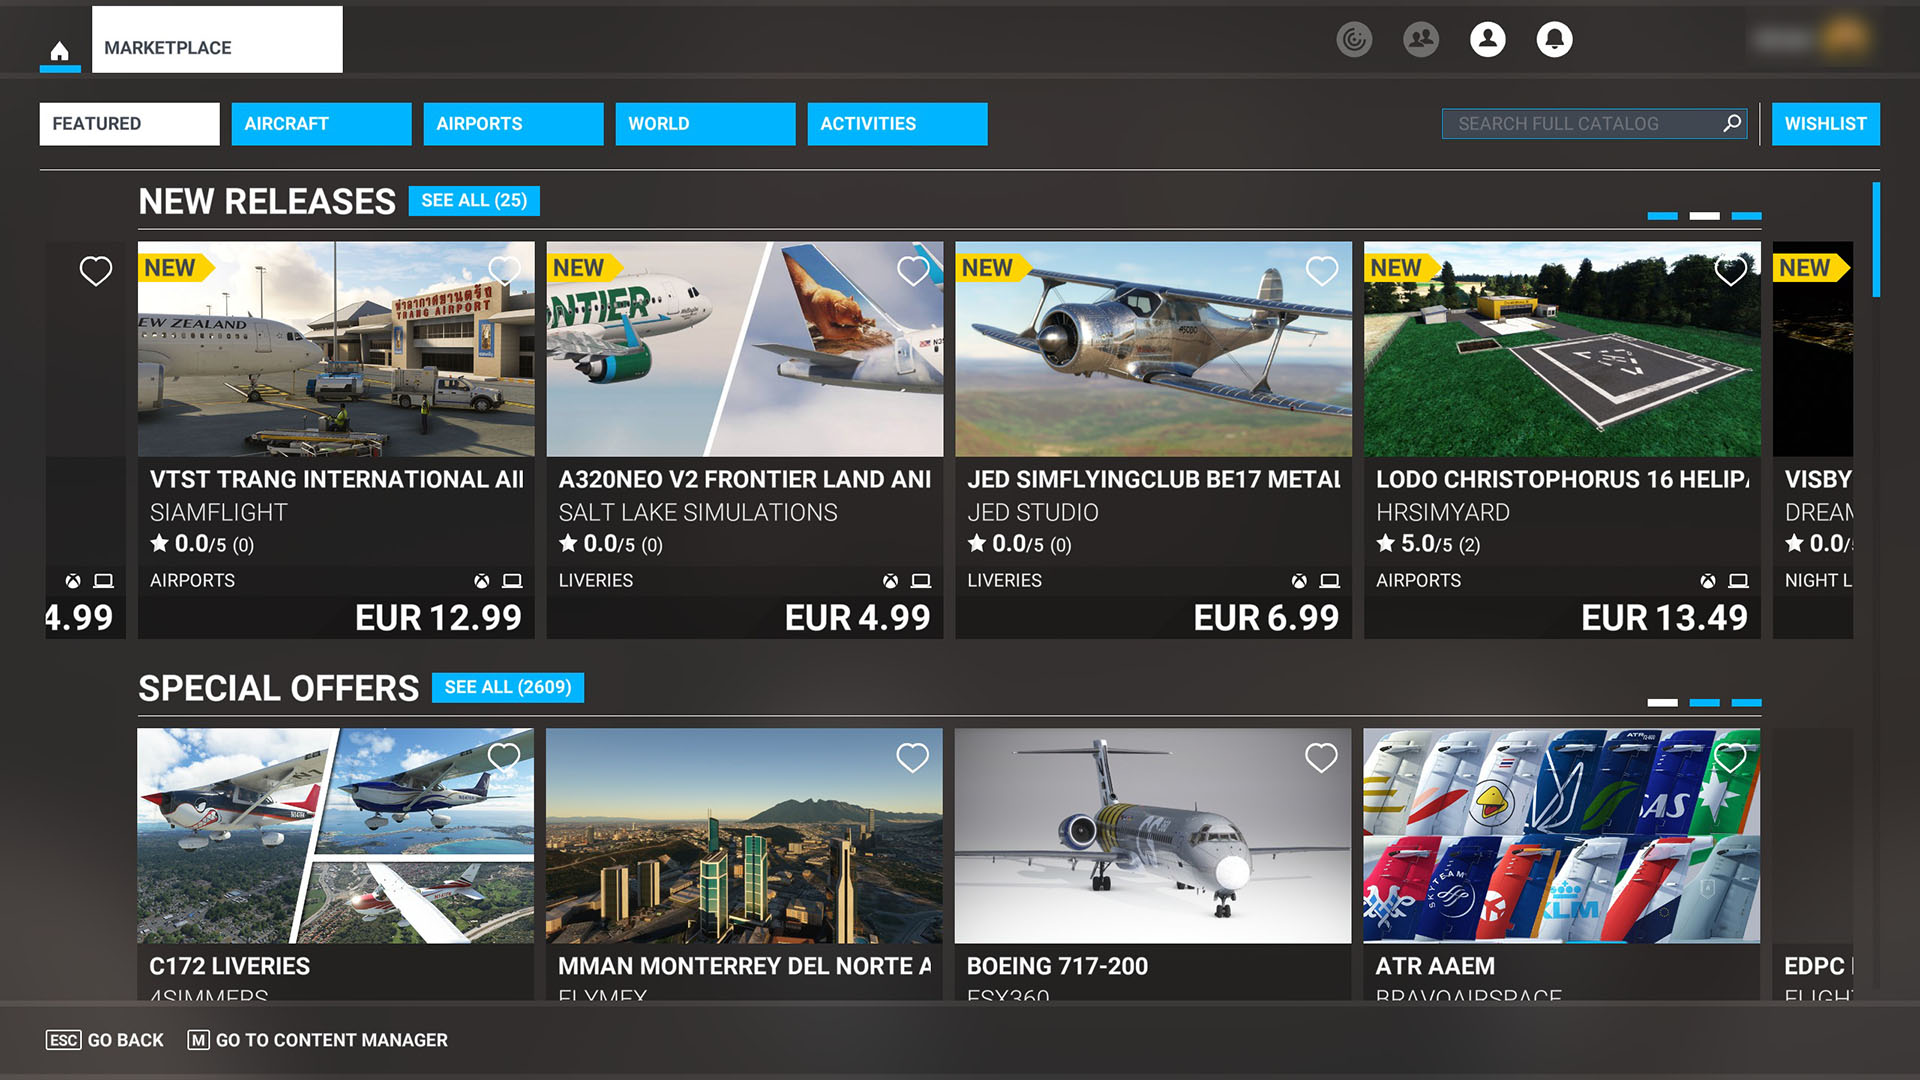
The add-ons available on the front page will vary as new releases are replaced by those that come after, and special offers expire and cycle.
Here you’ll find a variety of categories that you can browse at the top, and you can search the catalog on the top right. You can also access your wishlist.
Each add-on’s box will include the title, the developer or publisher, the rating provided (in theory) by other users, the type of add-on, the platform, the price, and possible deals.
The platform icons are important. An Xbox logo will tell you that the add-on is available for Xbox Series X|S. The laptop icon means that the add-on is for PC.
If an add-on has both icons, it means that the purchase will entitle you to use the content on both platforms. It’s worth mentioning that if you’re on Xbox, the official marketplace is the only option available to purchase add-ons. None of the other options listed below applies to you.
Once you have found and selected the add-on you want to purchase, you can click on its box and you’ll find yourself on a screen like the one below.
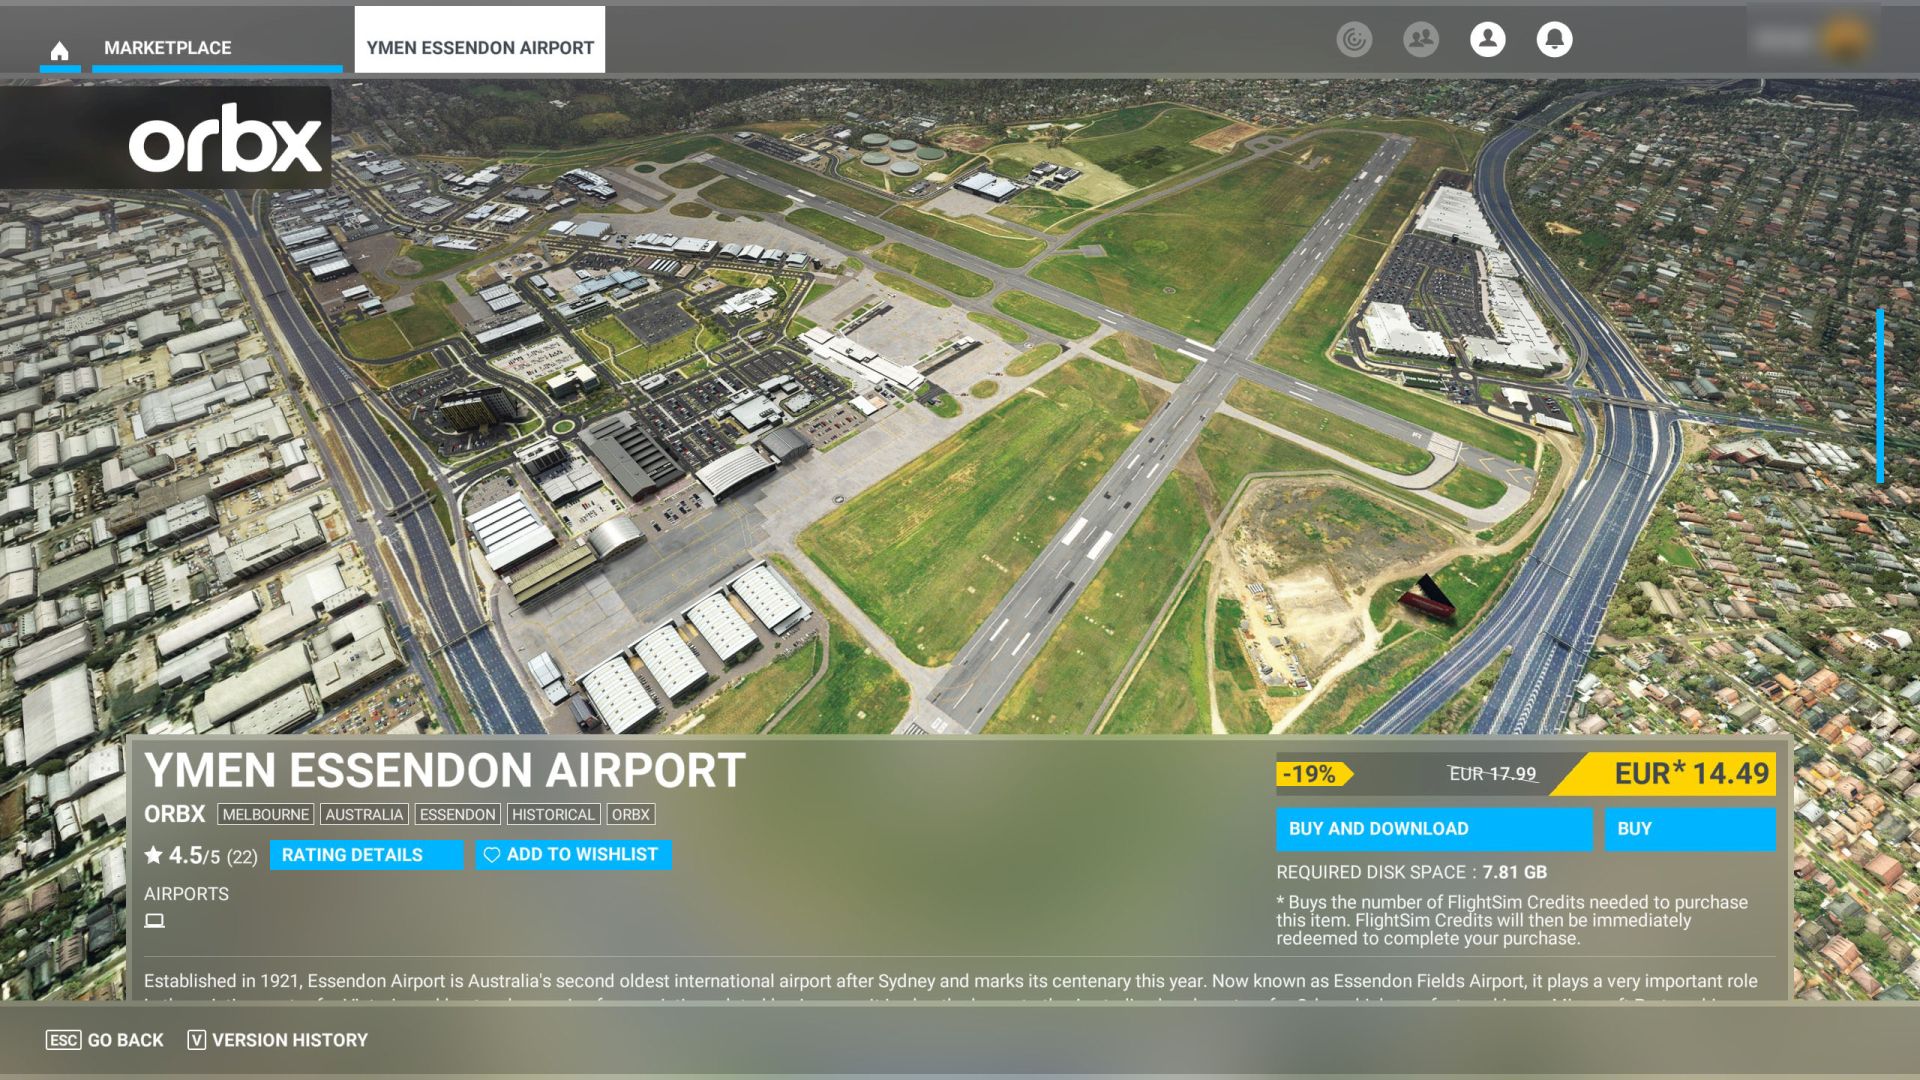
Besides the information that you could already see in the previous menu, you’ll find the ability to see the rating breakdown with the “rating details” button, the amount of disk space required (yes, a lot of addons are rather hungry in terms of space), a description, and a series of screenshots to give you a better idea of what the addon looks like.
You’ll also find a button to add the add-on to your wishlist and two purchase options which are pretty self-explanatory: “Buy” lets you purchase the add-on without downloading it just yet, while “Buy and Download” will immediately start the download.
In the Marketplace you’ll also find several free add-ons from Microsoft. These are the World Updates and City Updates that have been released over time, and downloading them will dramatically improve the look of the regions affected.
Another relevant element to keep in mind is that if you have purchased the Deluxe or Premium Deluxe editions of MSFS, all aircraft published directly by Microsoft are permanently discounted by 33% for you.
Once you have some add-ons, you can install them (if you haven’t already) and uninstall them via the Content Manager. This is a little less visible as you need to access it via the profile tab on top of the main menu and then click on the “Content Manager” box.
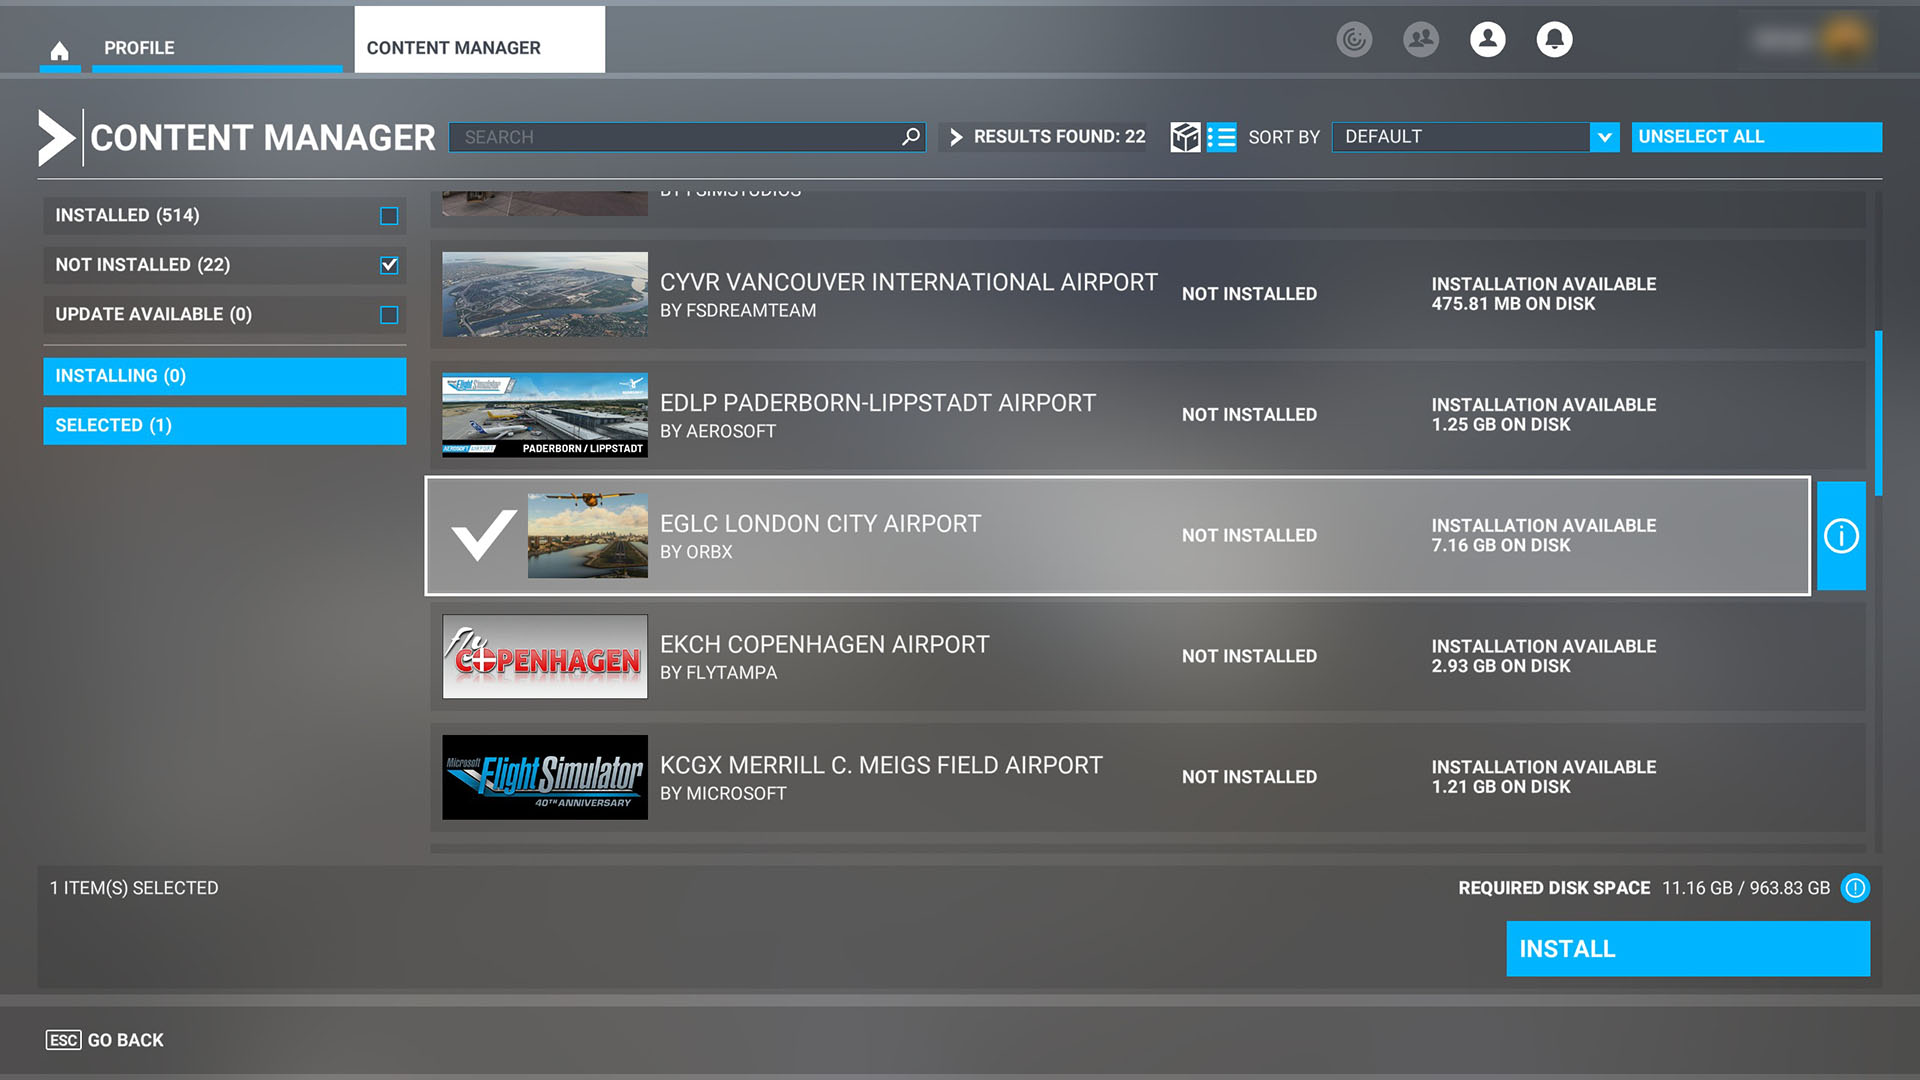
In the menu above you can easily find the add-ons that you have installed, those that are not yet installed, and those that have an update available.
To install or update an add-on, simply select it and click “Install” or “Update.” You’ll see the disk space required in the dedicated box. You can select multiple add-ons and install or update them at the same time.
To uninstall an add-on, you have to select one that you have installed and click “Delete” as you can see below.
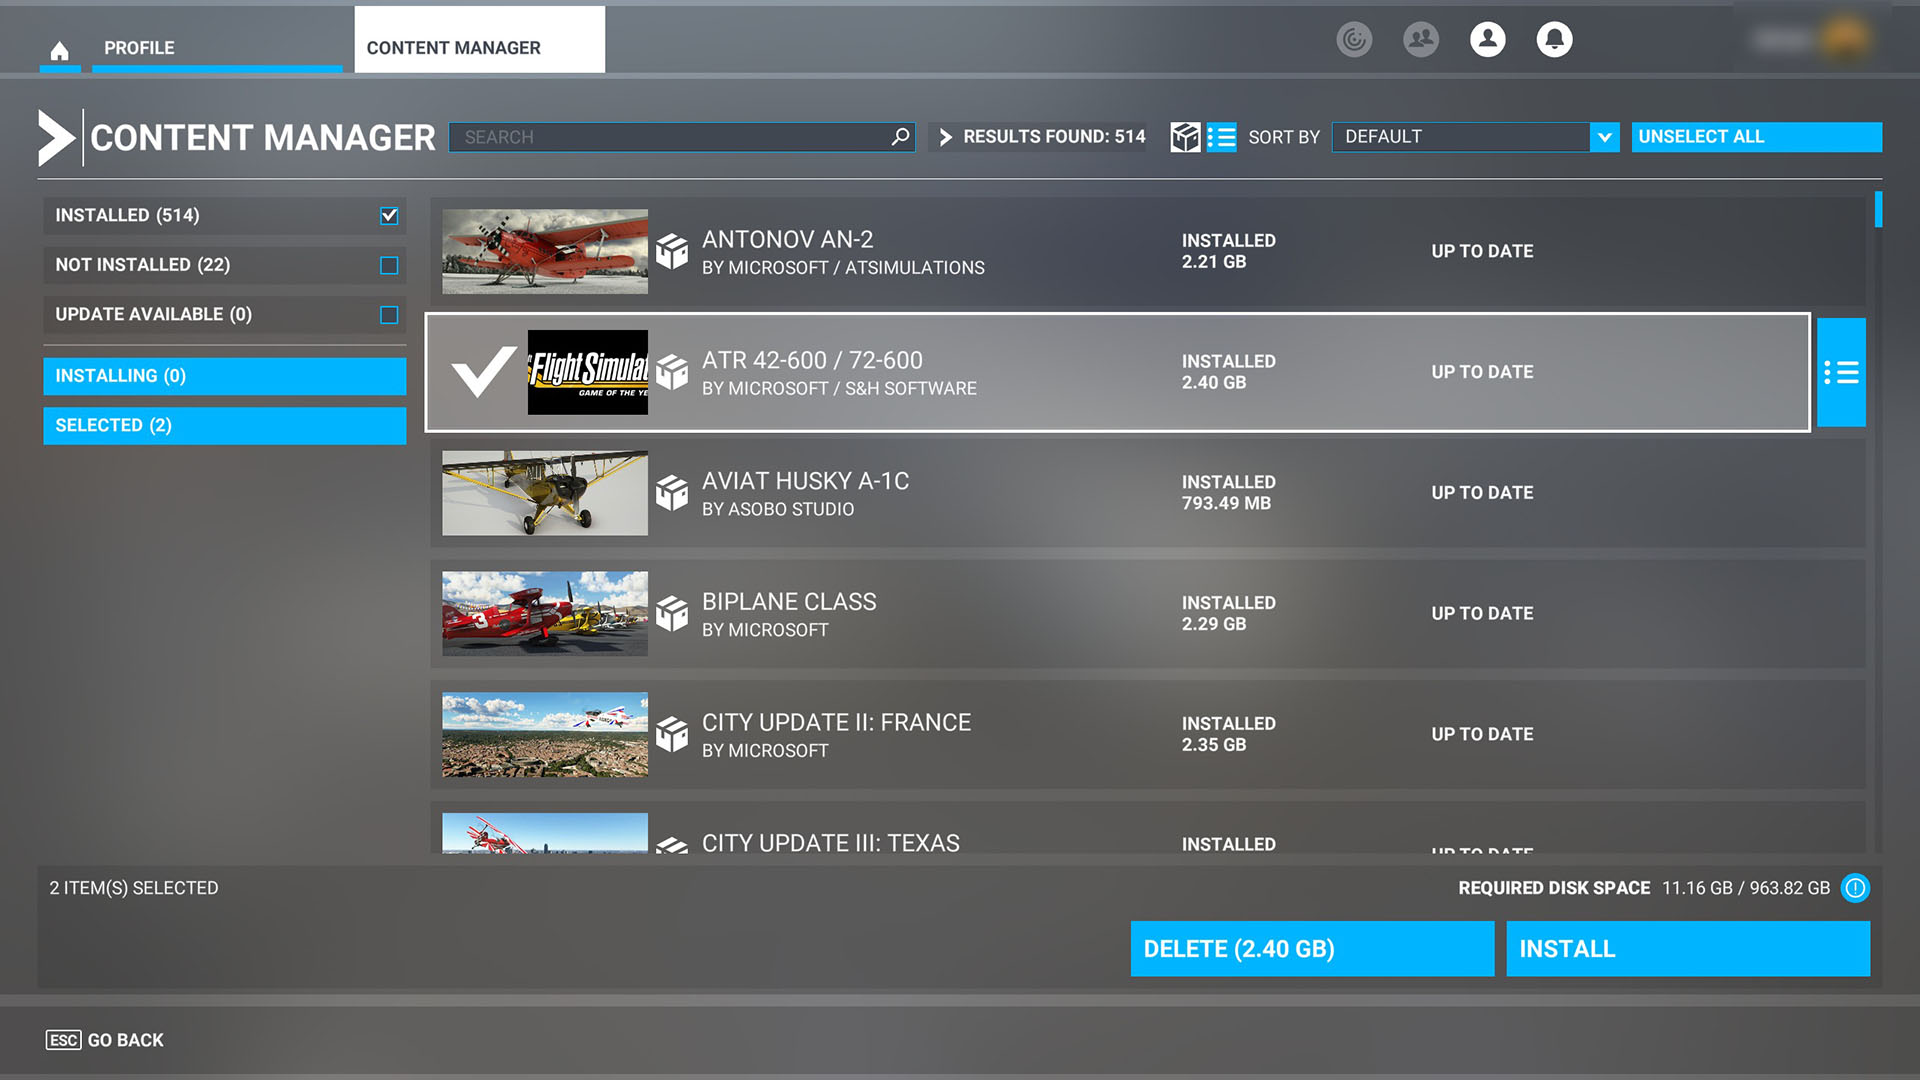
Once again, you can select multiple add-ons to delete at the same time. Keep in mind, that deleting add-ons isn’t irreversible. You can reinstall anything you have purchased at a later time.
Some add-ons will be marked with a blue icon with three points and three lines as you can see above. This means that they have several parts that can be installed or uninstalled individually depending on whether you want them or not. Clicking on the icon will display the parts.
It’s worth mentioning that you can use the Content Manager to manage only the add-ons you purchased on the Official Marketplace. Add-ons purchased in other stores are handled differently and this brings us to…
The Community Folder
The community folder is a fundamental location in your disk drive where you’ll store all the Microsoft Flight Simulator add-ons that you did not purchase from the official Marketplace.
If you have the Windows Store version of the simulator, the community folder will be in the following location, just replace “XXX” with your Windows username. “YYY” is a random app code generated when you install the simulator.
C:\Users\XXX\AppData\Local\Packages\Microsoft.FlightSimulator_YYY\LocalCache\Packages\Community
Keep in mind that you may have to make your invisible folders visible. For instance, on Windows 11 you can click on “View” in File Explorer, then the last option “Show” and check “Hidden Items.”
If you have the Steam version of the sim, the Community Folder is in the following location.
C:\Users\XXX\AppData\Roaming\Microsoft Flight Simulator\Packages\Community
Lastly, if you have installed the simulator in a custom folder, you’ll find the Community folder inside it.
Every add-on installed in the simulator that didn’t come from the official Marketplace is stored in the Community folder, either with its own folder or with a link to that folder if it’s installed somewhere else.
Third-Party Stores
There are a variety of third-party stores that sell add-ons for Microsoft Flight Simulator, and usually, they have their own installer or client.
For instance, Orbx has Orbx Central, which we’ll use as an example here (after all, they do pay our bills), but most stores and clients function similarly. Once you have downloaded and installed Orbx Central, you will be asked to select your simulator.
If you have only Microsoft Flight Simulator installed, it’ll be the only option. This will automatically find your community folder, but some clients from other stores will ask you about its location. The next thing you will be asked is to select a backup folder and a maximum size, which you can set as you wish.
You’ll then be asked to create a Library and a folder on one of your disk drives. This is where the add-on files will physically be located.
You’ll then be asked to add a payment method, which you can skip if you just want to browse or get the add-ons that are free. The last menu asks you whether you’d like to be sent emails about new products for different simulators.
Once you’re past the initial setup, I would recommend creating a second library, unless you have a tremendous amount of available space on your SSD. Most small add-ons don’t require being installed on an SSD, because they really don’t have to move that much data to load on the simulator when you approach them.
As such, you can save SSD space by having an additional library on a big and slow HDD in which you’ll install the smaller add-ons, while the big ones can be installed on a library on your SSD. To create additional libraries, you can click on the gear icon on the top right, select “Libraries” and then click on the “Create a New Library” button.
When you’re ready, you’ll find a menu pretty much similar to the one you found within the official marketplace. The only relevant difference is that the add-ons sold here are available only for PC.
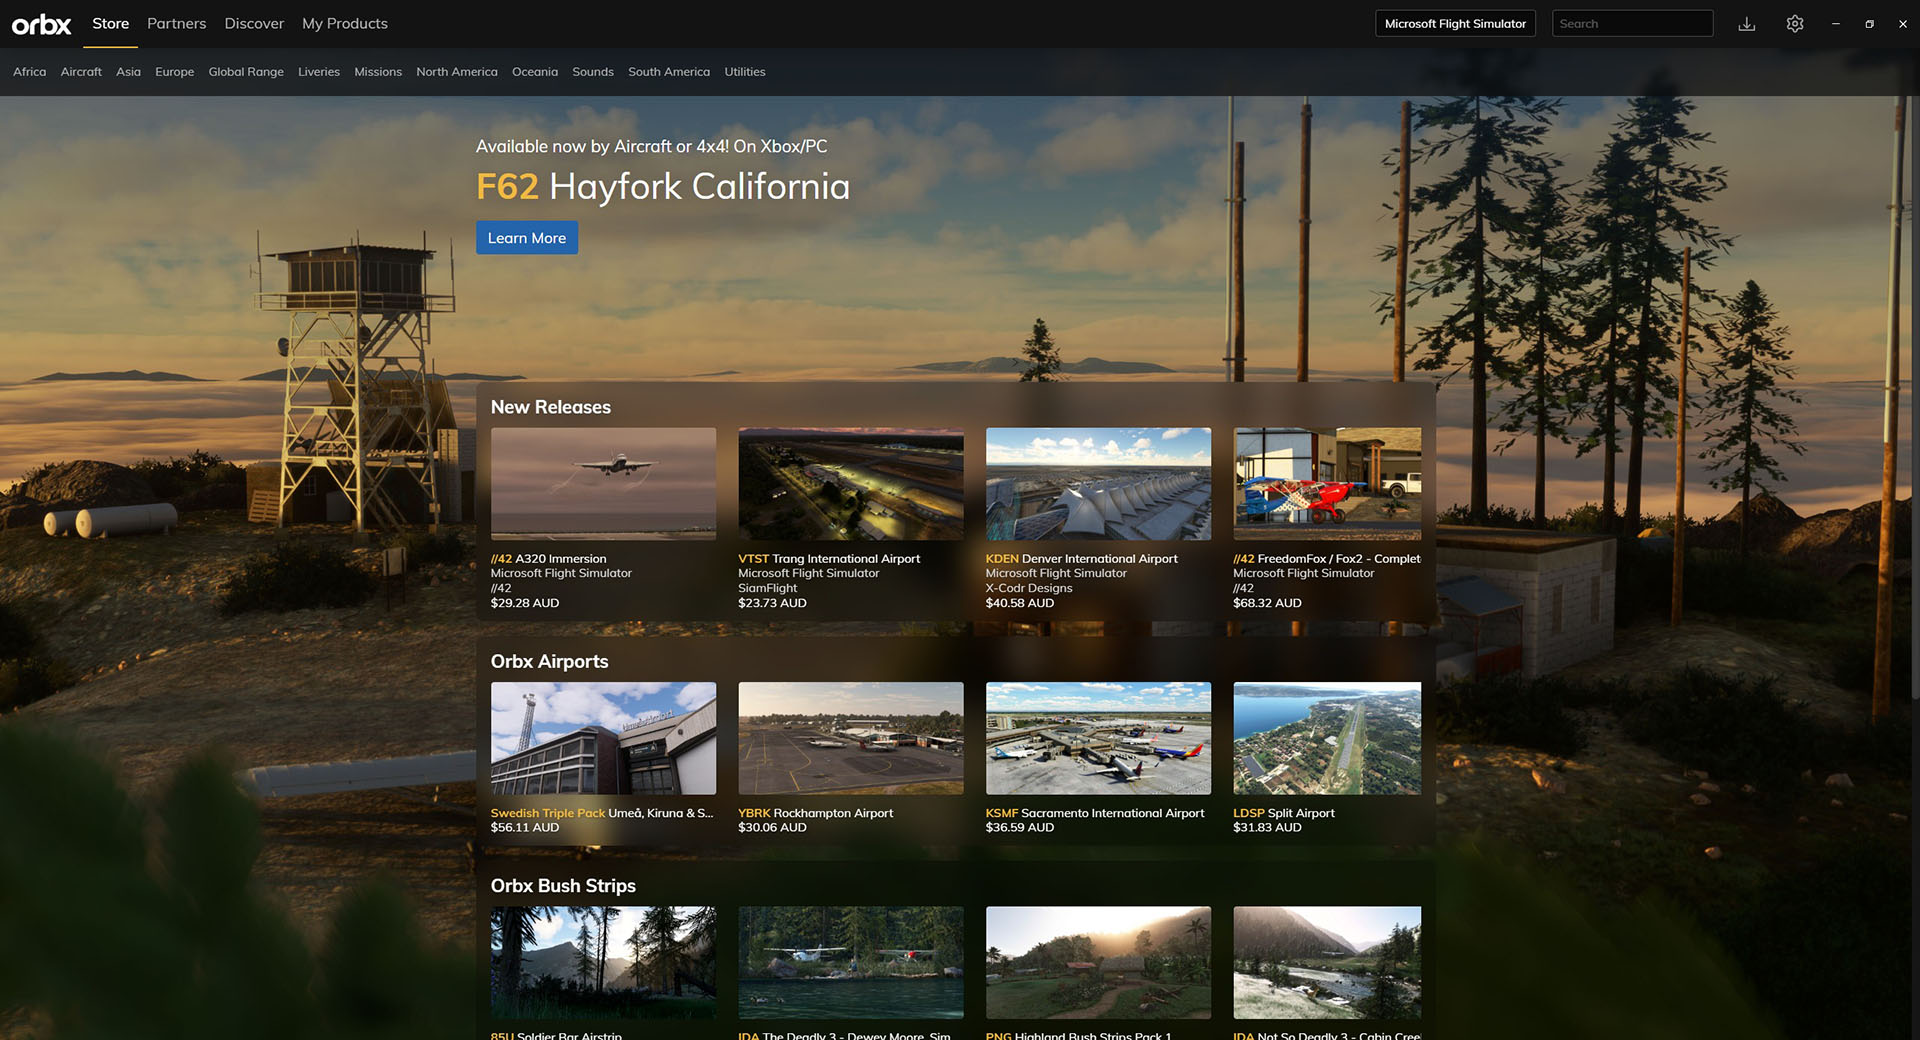
Here you can browse the new releases or the products by category or region. Orbx doesn’t just sell its own self-produced Microsoft Flight Simulator add-ons, but also those from a variety of partner developers that you can find in the “Partners” menu.
The “Discover” menu brings up a map that lets you pick your add-ons by location in the world.
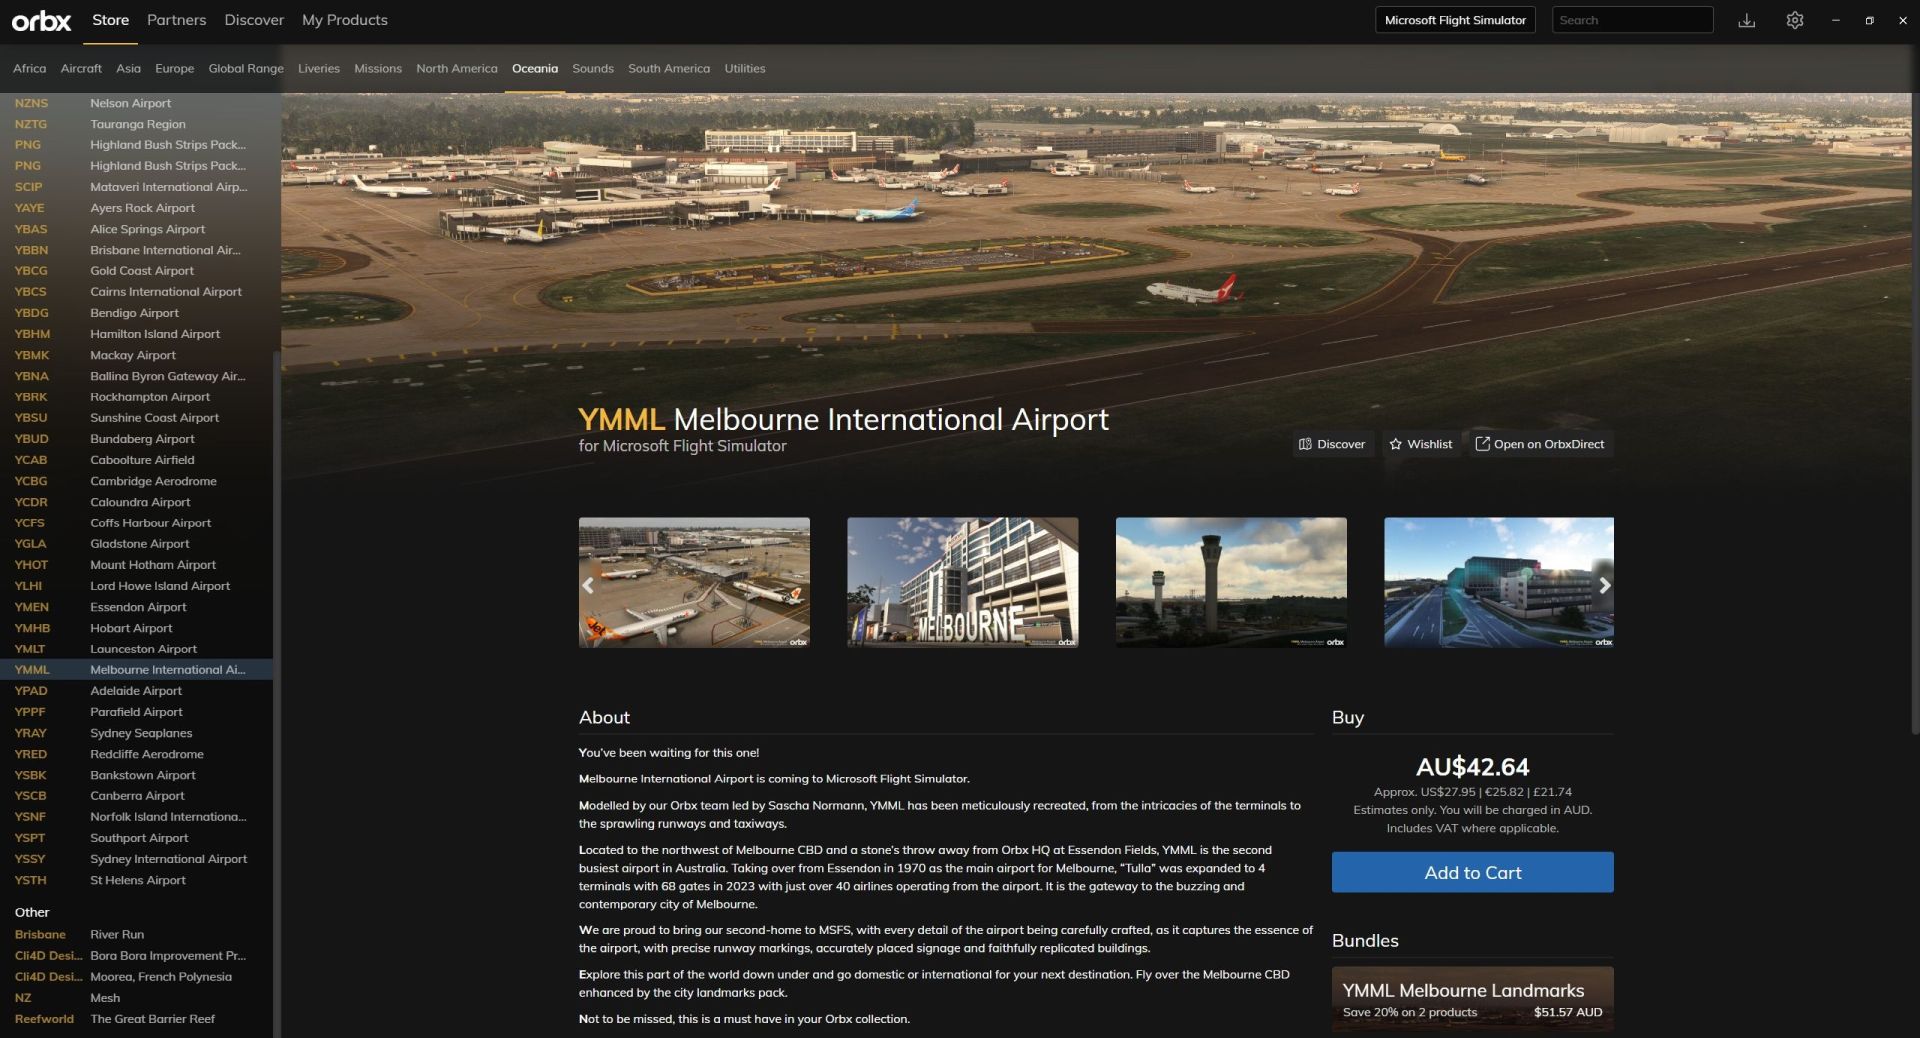
Once you have selected the add-on you want, you’ll find the ability to wishlist it, a variety of screenshots and a description, the price, and the “Add to Cart” button to begin the purchase process.
Some add-ons will also have bundle options that will let you purchase them together with related ones (for instance Melbourne Airport with the city landmarks package) at a discounted price.
Once you have made your purchase, you’ll be able to download your add-on in one of your libraries and will automatically place a link to it in your Community folder.
If you want to uninstall an add-on, you can use the dedicated button or right-click on the name of the add-on in the list on the left and select the option to remove it.
If an add-on is updated, the client will download updates automatically unless you have unchecked the option. Other clients require you to start the updating process manually for each product.
While this is rare nowadays, there are also clients that will simply download an installer or a zip file. In the former case, you will simply have to run the installer like you do for any app, while in the latter case, you’ll have to unpack the zip file in the community folder (or in a library folder of your creation, from which you’ll need to place a link manually in the community folder).
It’s worth mentioning that installers may ask for the location of your community folder, so keep it handy.
Individual Developer Stores
Some developers run their own e-commerce platforms and don’t sell their products in the big Microsoft Flight Simulator storefronts. Some of them have their own installer or clients dedicated exclusively to their products (like Fenix or PMDG). Others will simply give you a code that lets you unlock a product on one of the big storefronts.
Lastly, there are those developers who will give you a specific installer for each add-on, or even simply a zip file.
Once again, in this case, all you have to do is run the installer or unpack the addon in your community folder.
Freeware Add-Ons
While the vast majority of high-quality add-ons are sold for a price, there are thousands of add-ons that are made and distributed for free.
The advantage is obvious, but the drawback is that quality control is much less strict, so I’d recommend being selective and not installing everything you find. Not only because you’d find yourself with many unoptimized and frankly sub-par add-ons, but also because keeping them all updated would be a massive chore.
By far the largest website where to find free add-ons for Microsoft Flight Simulator is Flightsim.to, where you’ll be able to find add-ons by category and region, and even has a handy rating system that can help you separate the best add-ons for those that may feature more debatable quality.
This kind of website requires the most hands-on approach, as you’ll have to download archive files and unpack them in your community folder.
Incidentally, please keep in mind that at times a free add-on creator can pack the add-on in a way that does not conform with the file structure of the community folder. Always make sure that the folder you’re placing in the Community folder has the files “layout.json” and “manifest.json” in it.
If they’re not there, they may be hidden deeper in the archive. You’ll have to find the right folder that has them and unpack that one in the Community folder.
Many free add-ons have dependencies from free object libraries. Usually, this is mentioned in their description. You will therefore, have to download these libraries as well and install them in the community folder like they were their own separate add-on.
If you don’t want to install all of your add-ons directly in the community folder, utilities like MSFS Addon linker come in very handy. They basically let you create libraries like commercial clients, and create links to the add-ons you unpack in these folders to your Community folder.
Mastering this powerful freeware program for Microsoft Flight Simulator can save you a lot of pain when it comes to keeping your add-ons organized. It may not seem necessary when you have five or ten, but when you have 500 or more, you’ll thank its creator bad2000.
Incidentally, it can also be used to organize the payware add-ons you have that don’t have an advanced installer that does the Library management and linking on its own.
If you want to keep up to date with flight simulation news, you should check out our daily roundup articles.

