With the release of Jurassic World: Archipelago, many fans of the popular dinosaur franchise are going to try Microsoft Flight Simulator 2024 for the first time.
If that’s you and you don’t quite know what to do, or if you’re considering jumping in and you wonder whether you’ll be able to enjoy the experience, you have come to the right place.
First of all, I understand that the idea of flying a plane in a simulator may sound intimidating, but don’t worry! Not all planes are made equal, and some are really quite easy to fly and to enjoy, with few controls to remember and operate. That’s all you need to start enjoying your dino tour on the Jurassic World islands.
That being said, if you’re new to flight simulators, welcome! We hope Jurassic World: Archipelago will help you find out just how awesome this genre is, and encourage you to stick around.
On the other hand, this little guide is dedicated to complete novices, so if you’re already experienced, you may find most of what you’ll read here pretty obvious.
It’s also worth mentioning that the principles explained here apply everywhere, and you can use them to learn to fly even if you prefer a more realistic setting. Just pick any airport you like as your base.
If you prefer watching to reading, a video version of this guide is available below.
So let’s start with the basics. Once you have installed Microsoft Flight Simulator 2024 and purchased Jurassic World: Archipelago, you need to download and install Orbx’s add-on client, Orbx Central. When the add-on launches on the official marketplace and on Xbox, there’ll be additional ways, and we’ll add them to this article when they’re available.
Once Orbx Central is installed on your PC, you can launch it and it’ll prompt you to log in to your Orbx account, which you created when you purchased the add-on. Then the client will automatically recognize that you have MSFS 2024 and prompt you to click on it to finish the setup.
After that, you just need to search for “Jurassic”, click on “Archipelago” on the left, and then on “install” on the right of your screen. After you’re done, you can quit Orbx Central, and you’re ready to rock and roll.
Launch Microsoft Flight Simulator 2024, and you’ll find yourself in the main menu.
Before you fly, there are a few easy steps you should take. Click on the little gear icon on the top right of the screen, and that will bring you to the settings menu.
On the “General” tab, you should at least set up your graphics according to your hardware. Since you have a gaming PC capable of running MSFS 2024, I will assume you know how to do this.
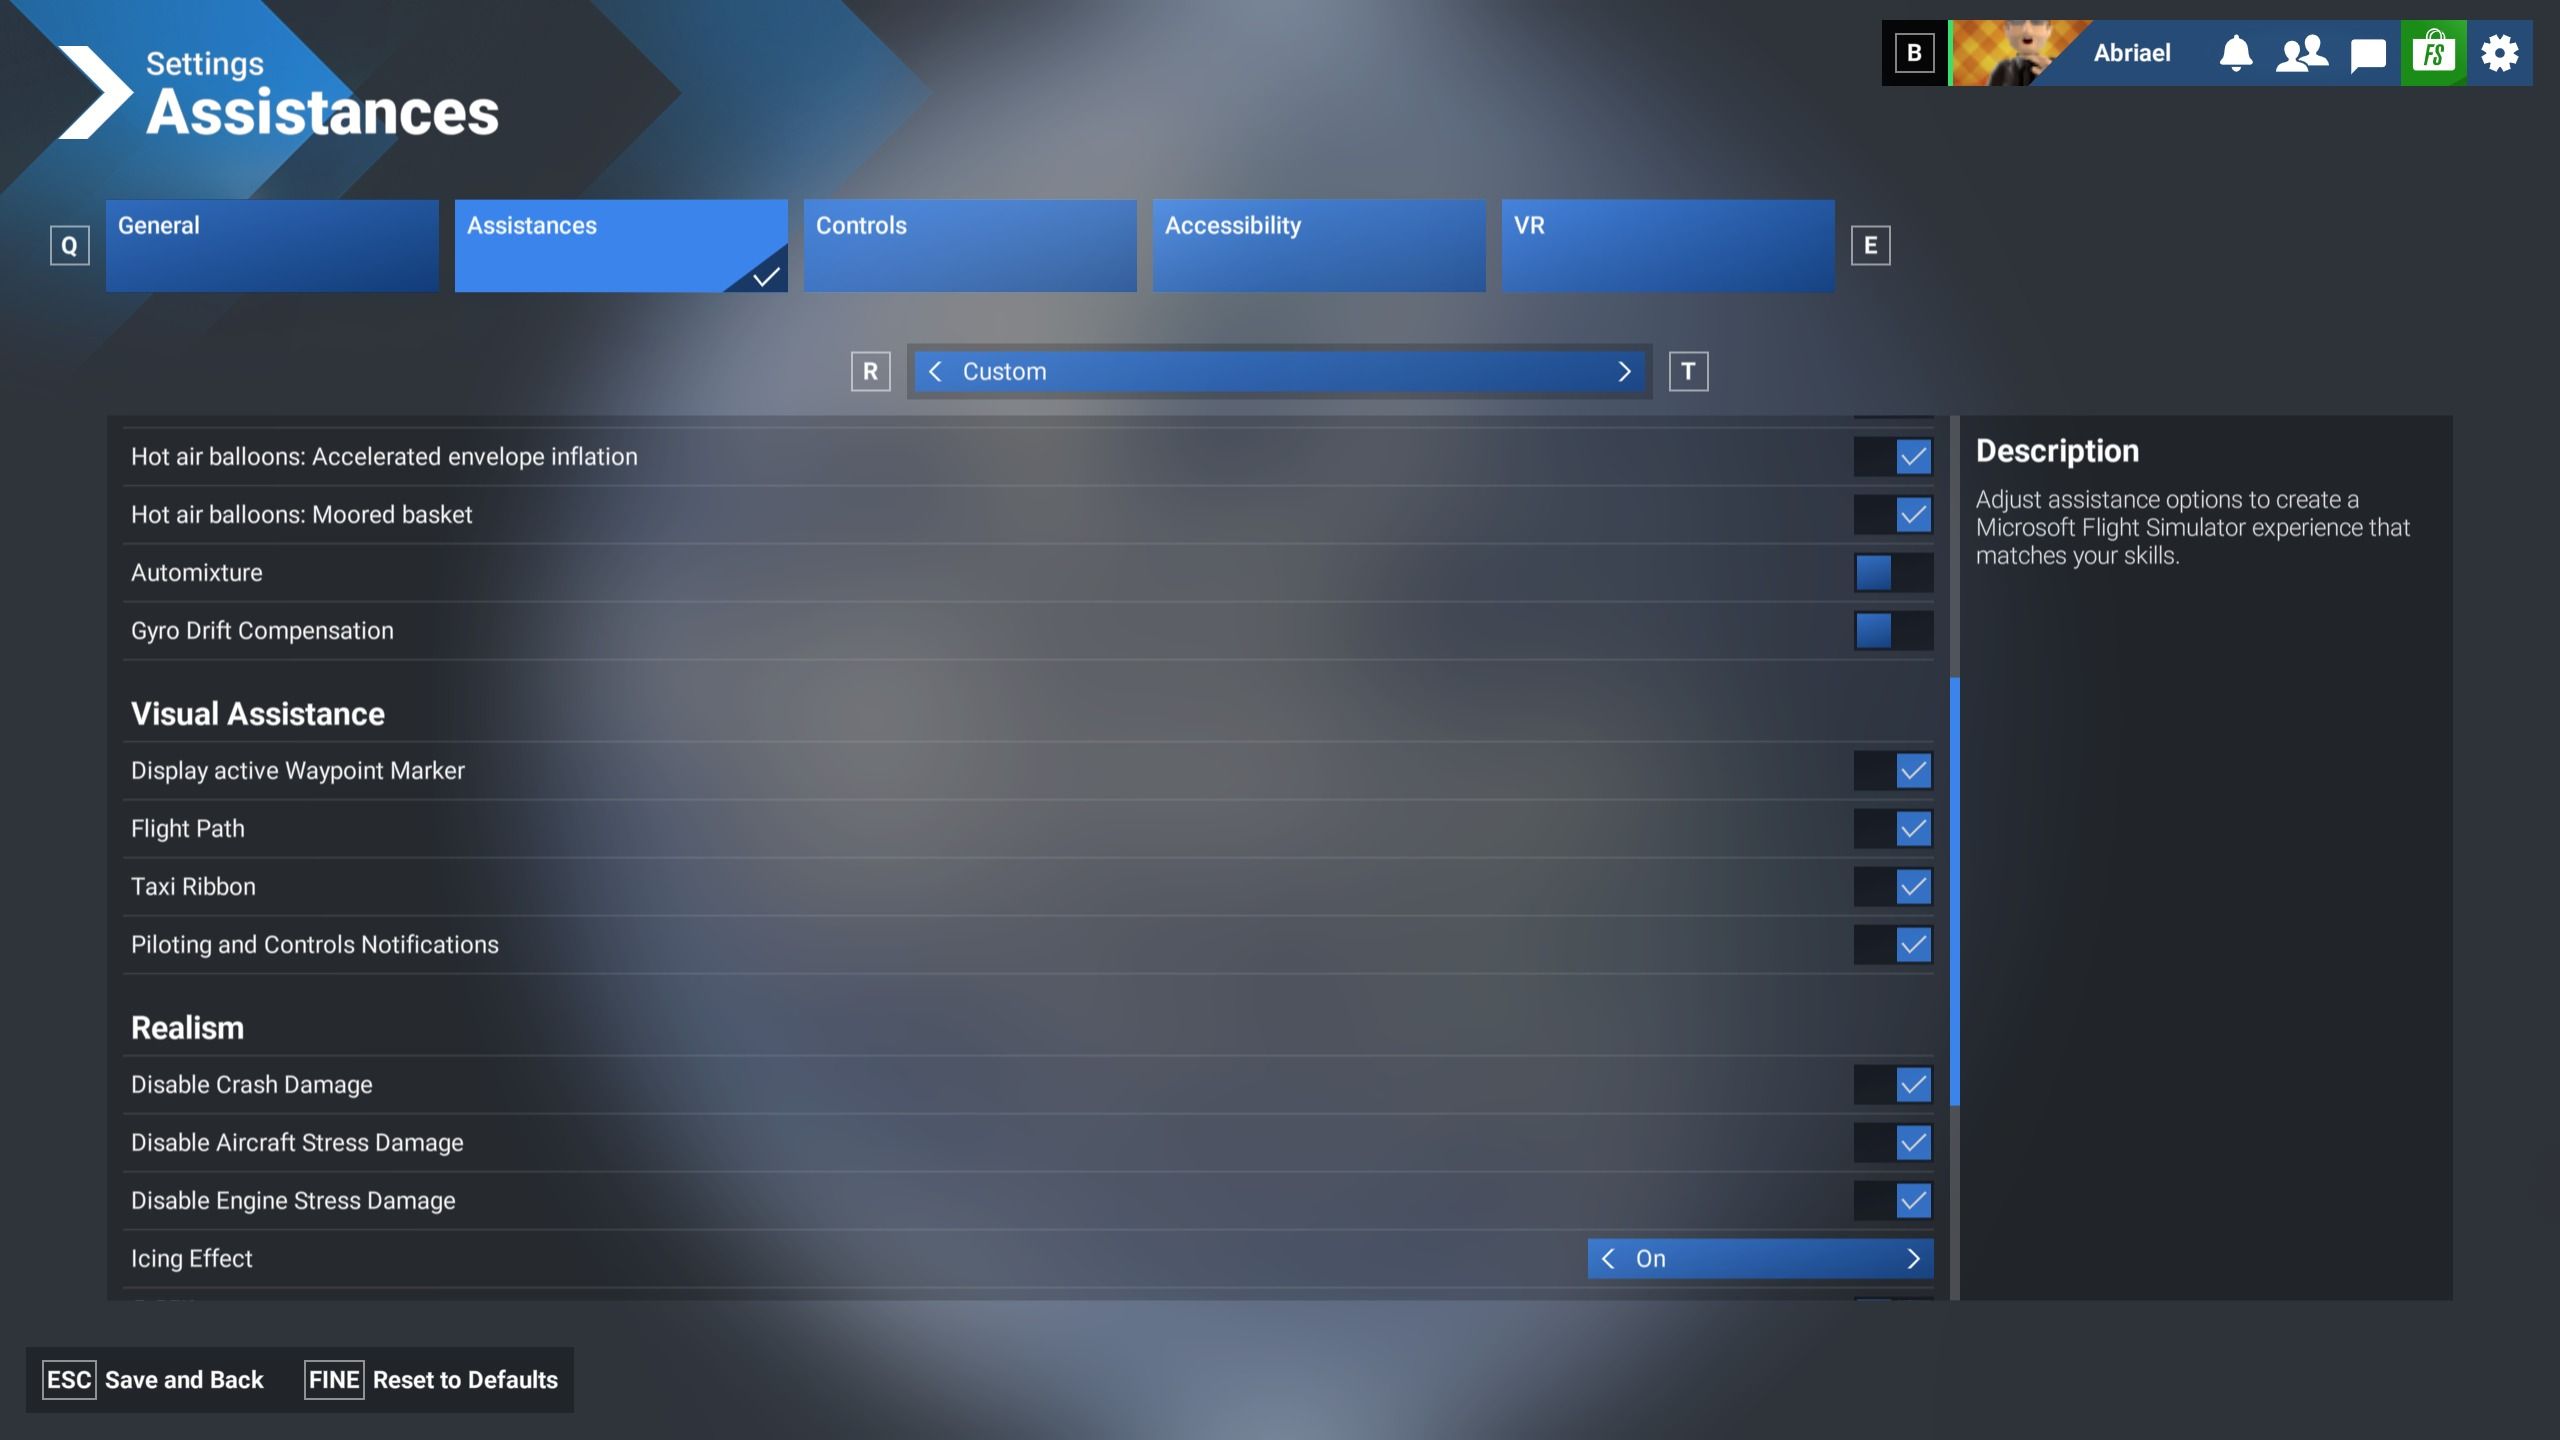
Then, go to the “Assistances” tab and I recommend selecting “Default Assists.” I understand that for a novice, it’s tempting to turn all the assists on, but you really don’t need to. It’s much better to start with an easy aircraft but learn to fly it properly (it really isn’t that difficult, I promise) than to develop bad habits by having too many assists interfere with your technique.
That being said, to make it easier on yourself, I would scroll down to the “Realism” section and select Disable Crash Damage, Disable Aircraft Stress Damage, and Disable Engine Stress Damage.
This doesn’t interfere with your learning, but it’ll give you a bit of leeway if you make mistakes. After you’re done, go to Save and Back.
Next, click on the top right of the screen on your Xbox Live nickname, and then use the “Customize Identity” to set up your avatar however you like it.
Once you’re done, go back to the main menu. The “Career” menu is notable, as it’s the best way you have to truly learn to fly and to enjoy Microsoft Flight Simulator 2024 beyond Jurassic World: Archipelago, but we won’t go through there now, since it takes time, and I’ll give you the crash course instead. You can visit that later if you’d like to expand your horizons (and very well you should!)
If you go to the “Activities” menu and then scroll right to “Custom Content” you can find a bunch of pre-made Jurassic World missions that are fun and educational, but today we’re sticking to the basics, unleashing our rebel spirit, and going freeform instead. Once you learn the basics, you’ll enjoy the missions more and with less stress.
On the main menu, click on Free Flight. Then use the search bar and search for “Nublar” and select “Isla Nublar South.” It’s a nice and large airfield we can start from, but when you’re familiarized with the simulator, you can pick any starting location in the archipelago.
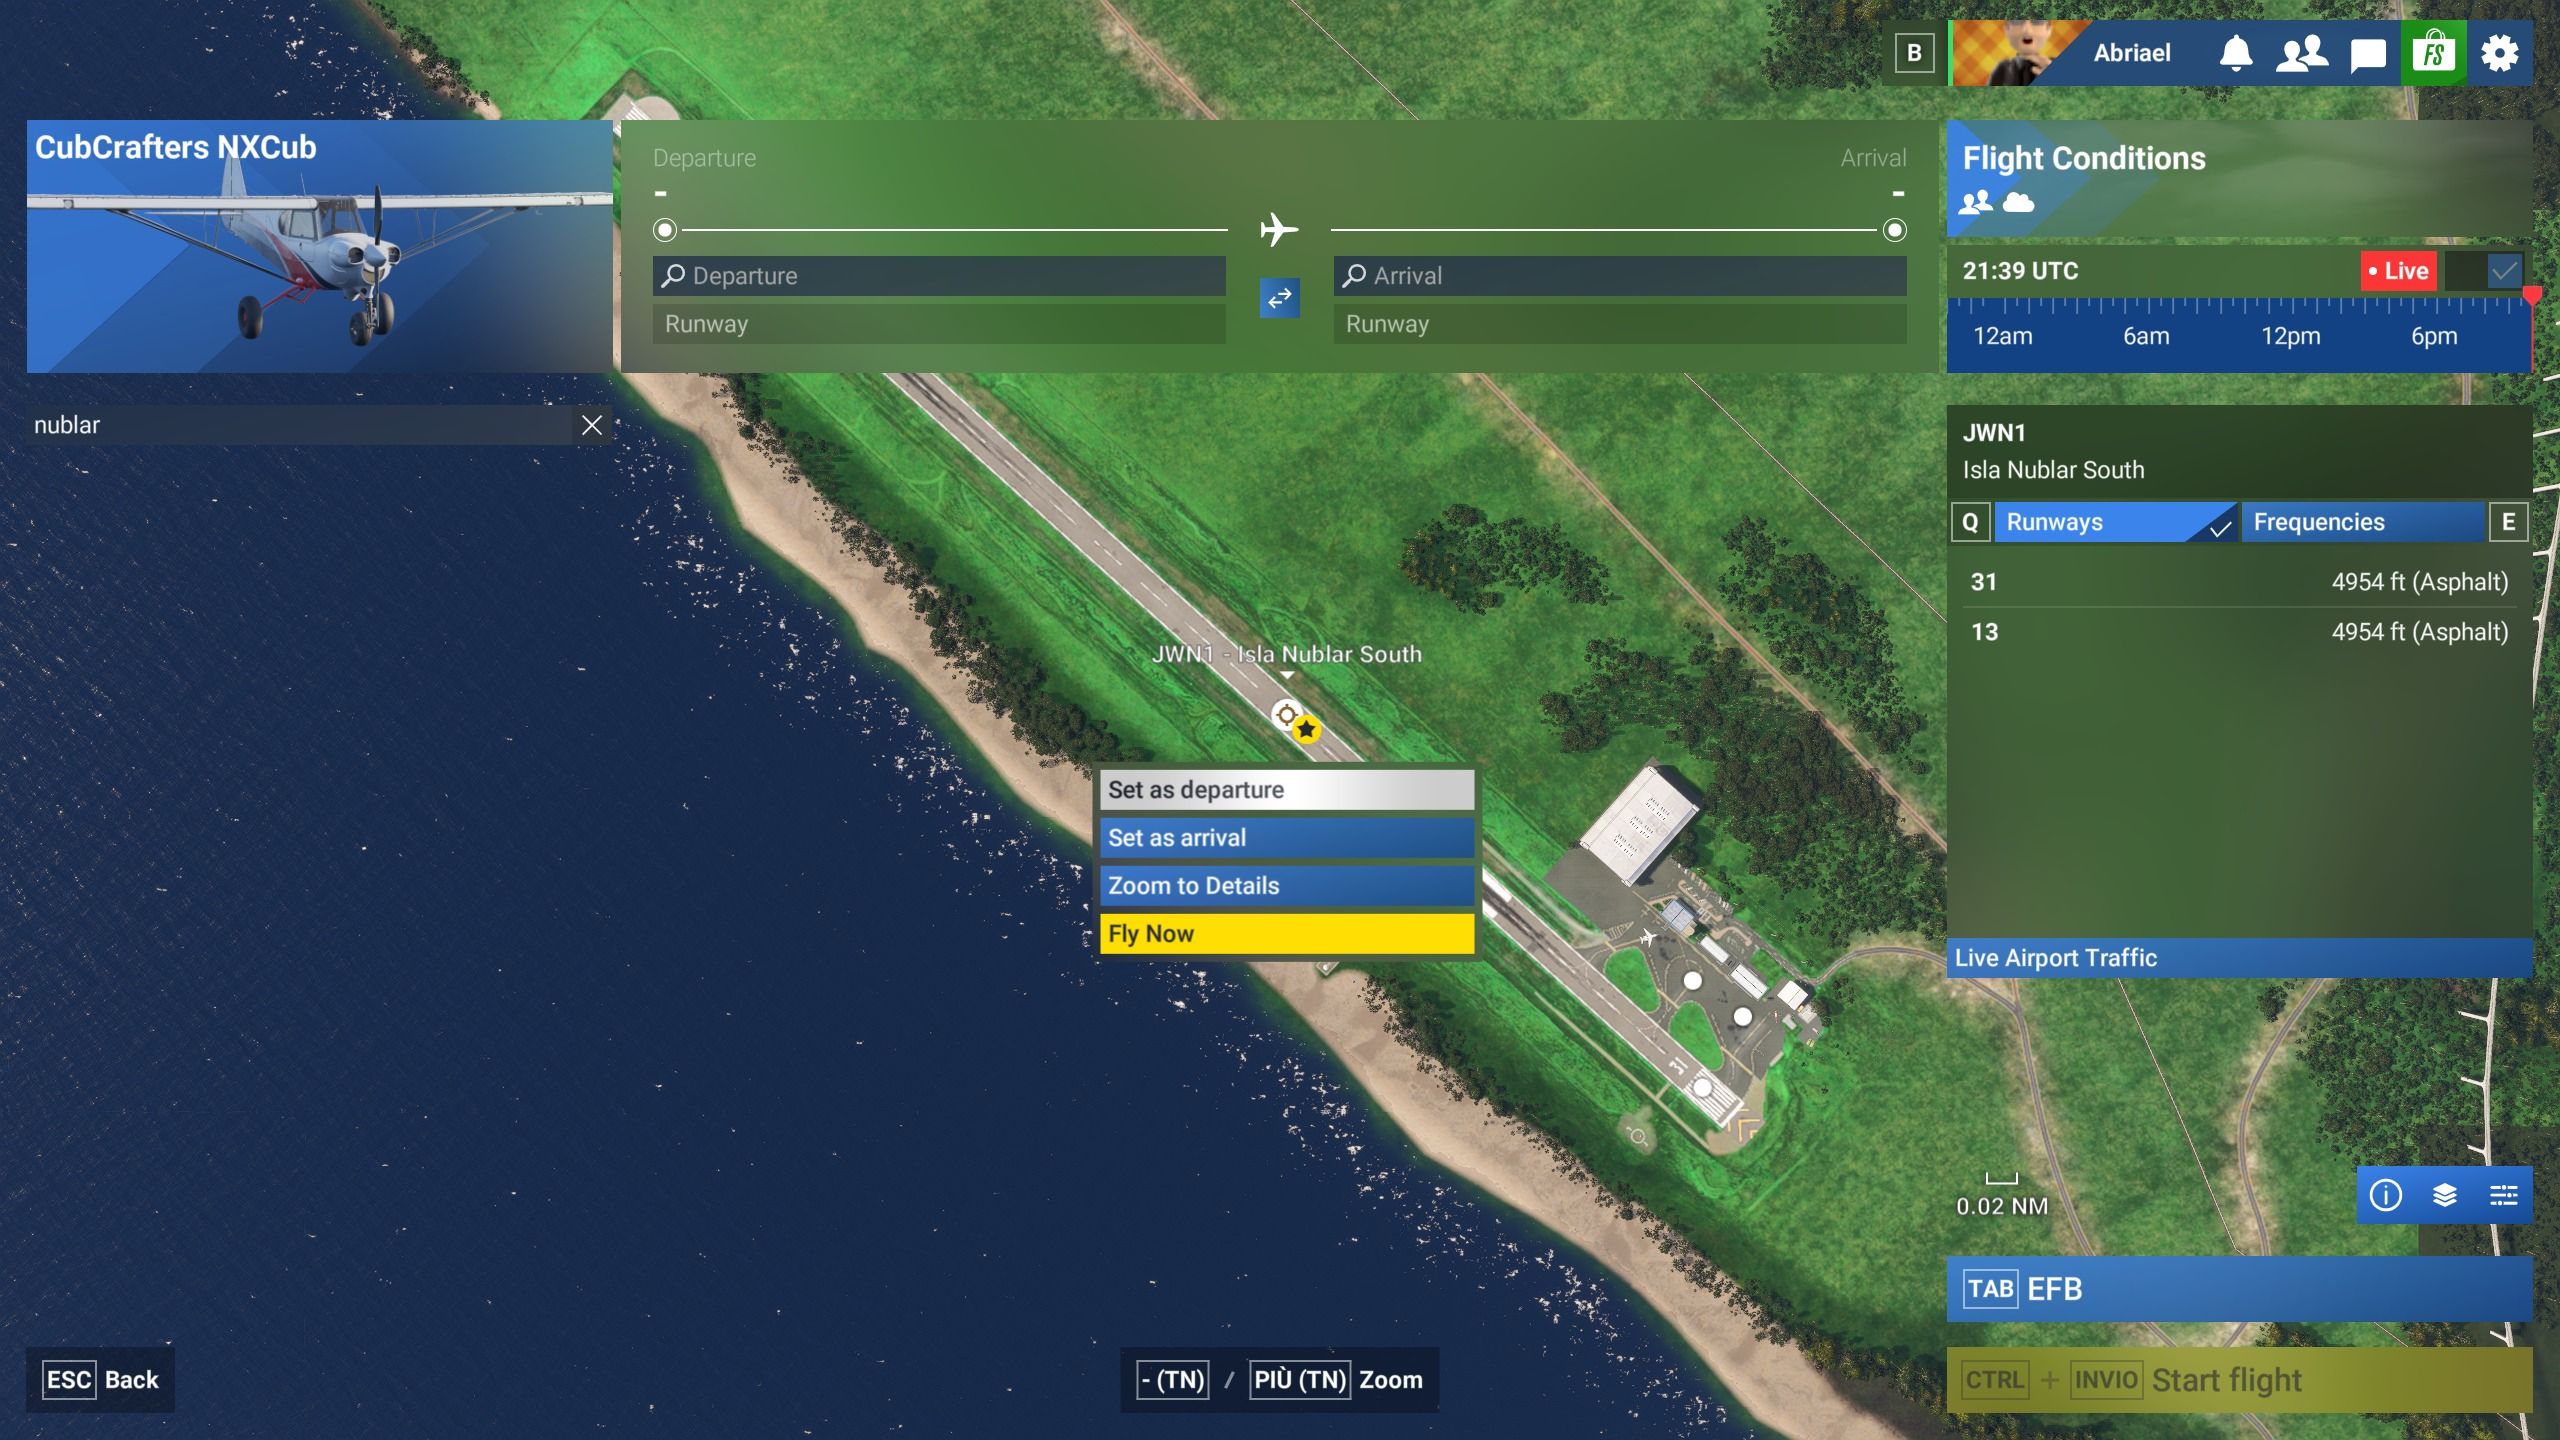
Zoom in with the scroll wheel of your mouse, then select the icon with the star, and “Set as Departure.” For the record, the other dots let you start from a particular side of the runway or from a parking position, but the icon in the middle places you on the quickest starting position with your engine already running.
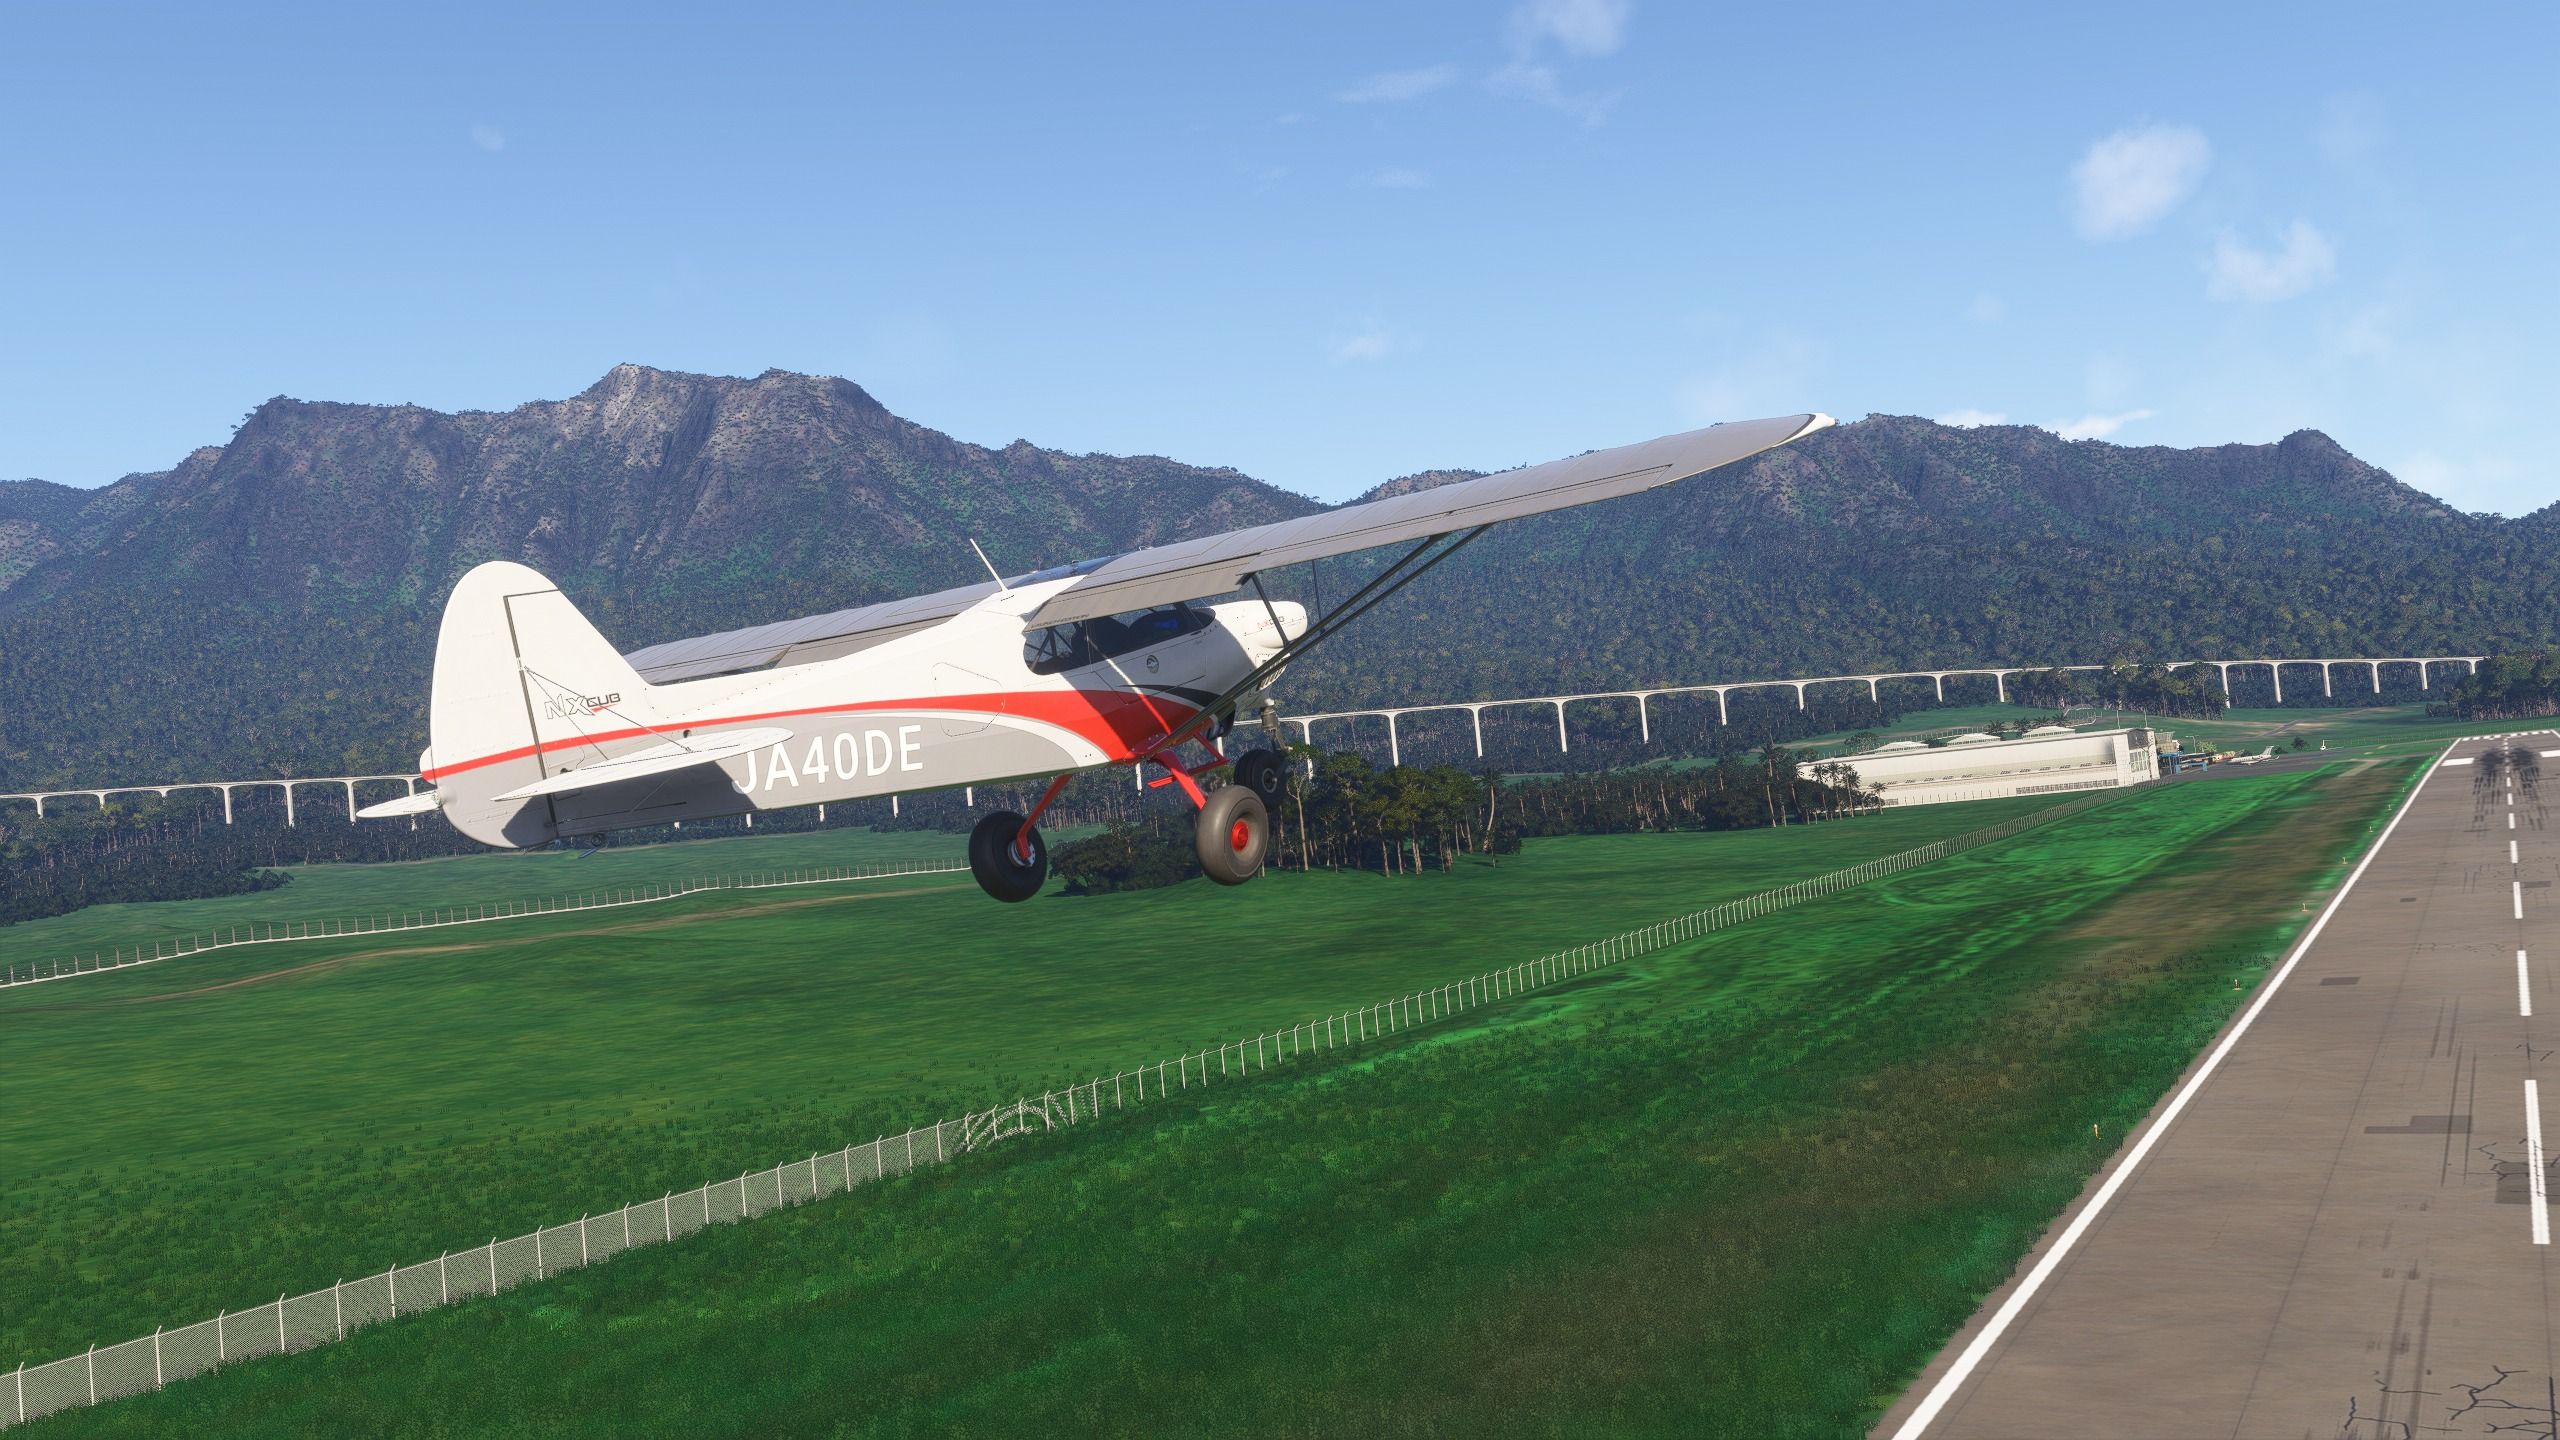
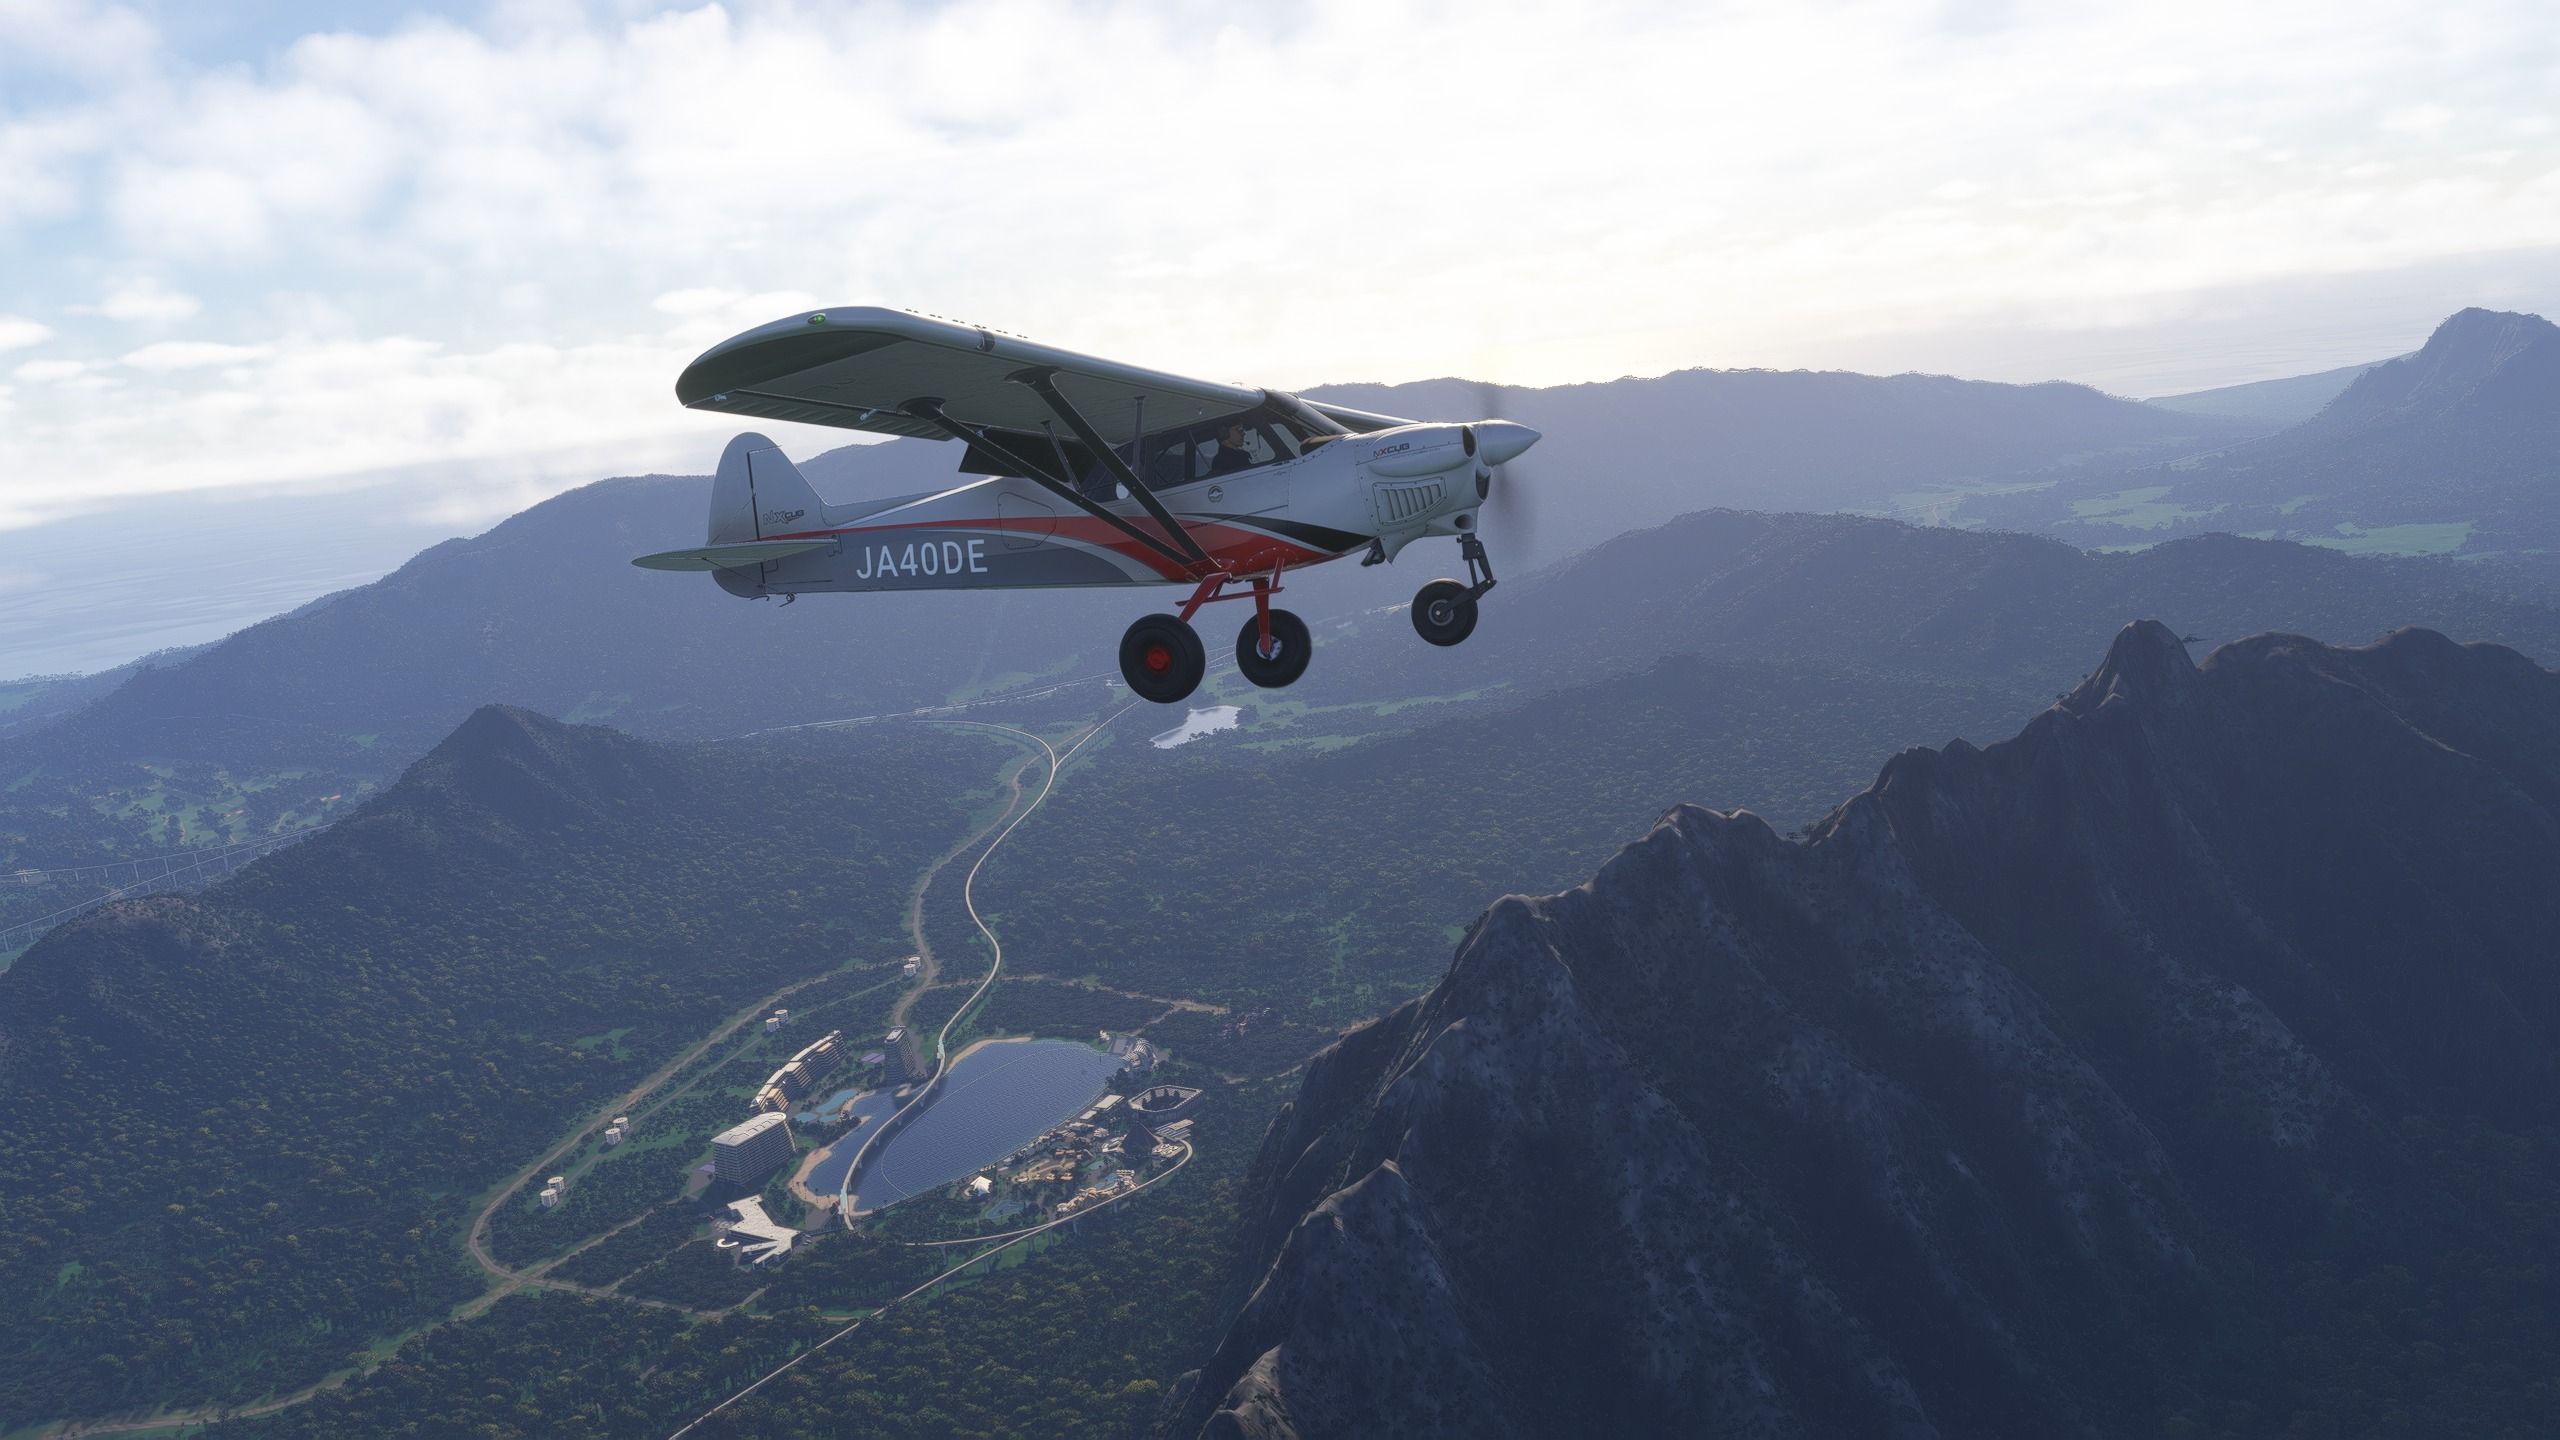
Then click on the rectangle with a plane, and use the search bar to find the “Cubcrafter NXCub.”
You may be tempted to use the “Cubcrafter X Cub” instead, which has dedicated Jurassic World liveries, but it’s a taildragger, which means an aircraft with a small landing gear under the tail.
Taildraggers are trickier on landing and take-off for novices, so for today, we’re using the NXCub that has a “tricicle” landing gear (which involves a landing gear under the nose), and it’s much easier to handle.
After you select the plane, click on “Save and Back.”
Click on Flight Conditions and set Weather and Time to “Live” so that they will follow the real world. That being said, you can change the time of day to have light; it’s hard to spot dinosaurs at night.
Lastly, select “Start Flight.” It’s time to jump into the Mosasaurus tank and see if you can swim. Keep in mind that the simulator may take some time to load the scenery.
When everything is loaded, click on “Ready to Fly” and let’s do this.
Since this guide assumes that you’re a novice, I will explain the controls, focusing on an Xbox controller with a bit of keyboard and mouse. If you have already invested in a flight stick (see below), it shouldn’t be difficult to adapt to that.
First of all, you can use the right stick to look around the cockpit (R3 will center your viewpoint again), and the view button to switch between the cockpit camera and the external one. When you’re in the cockpit, you can also operate all the controls with a mouse.
Regulate your altimeter with the comma key on the keyboard. You could do it manually, depending on the atmospheric pressure that would be communicated by air traffic control, but that’s beyond the scope of this guide.
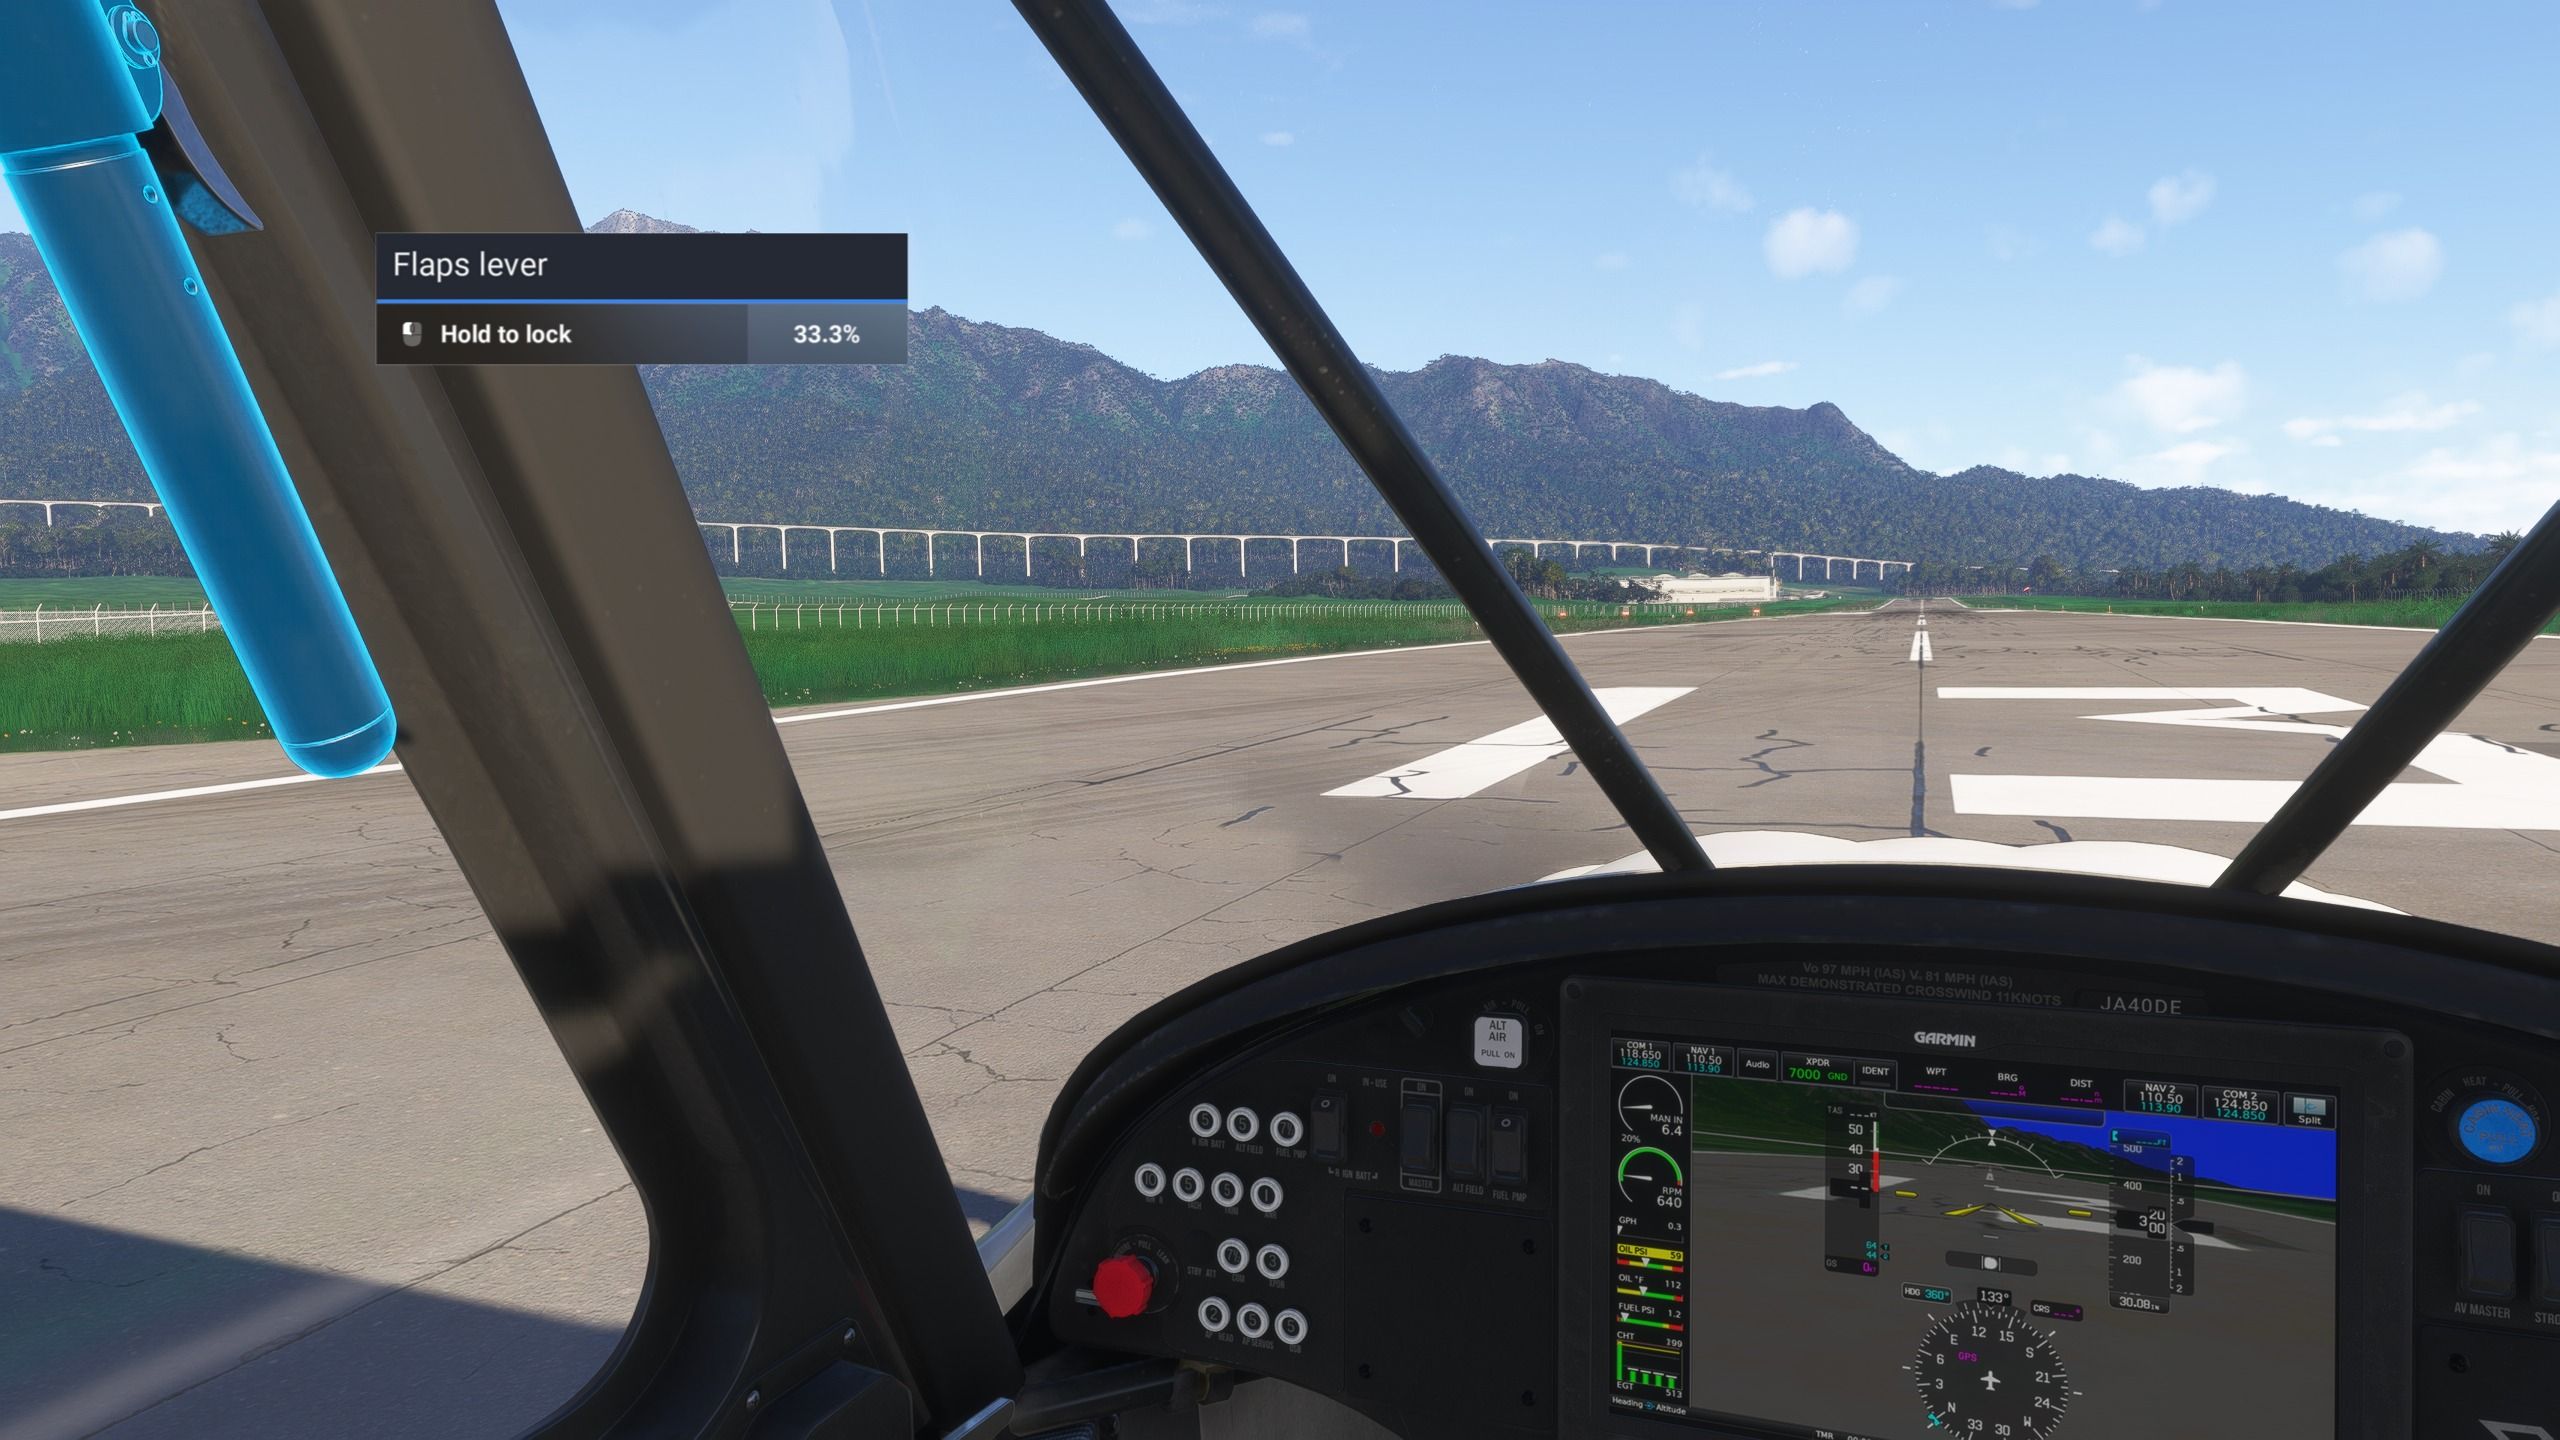
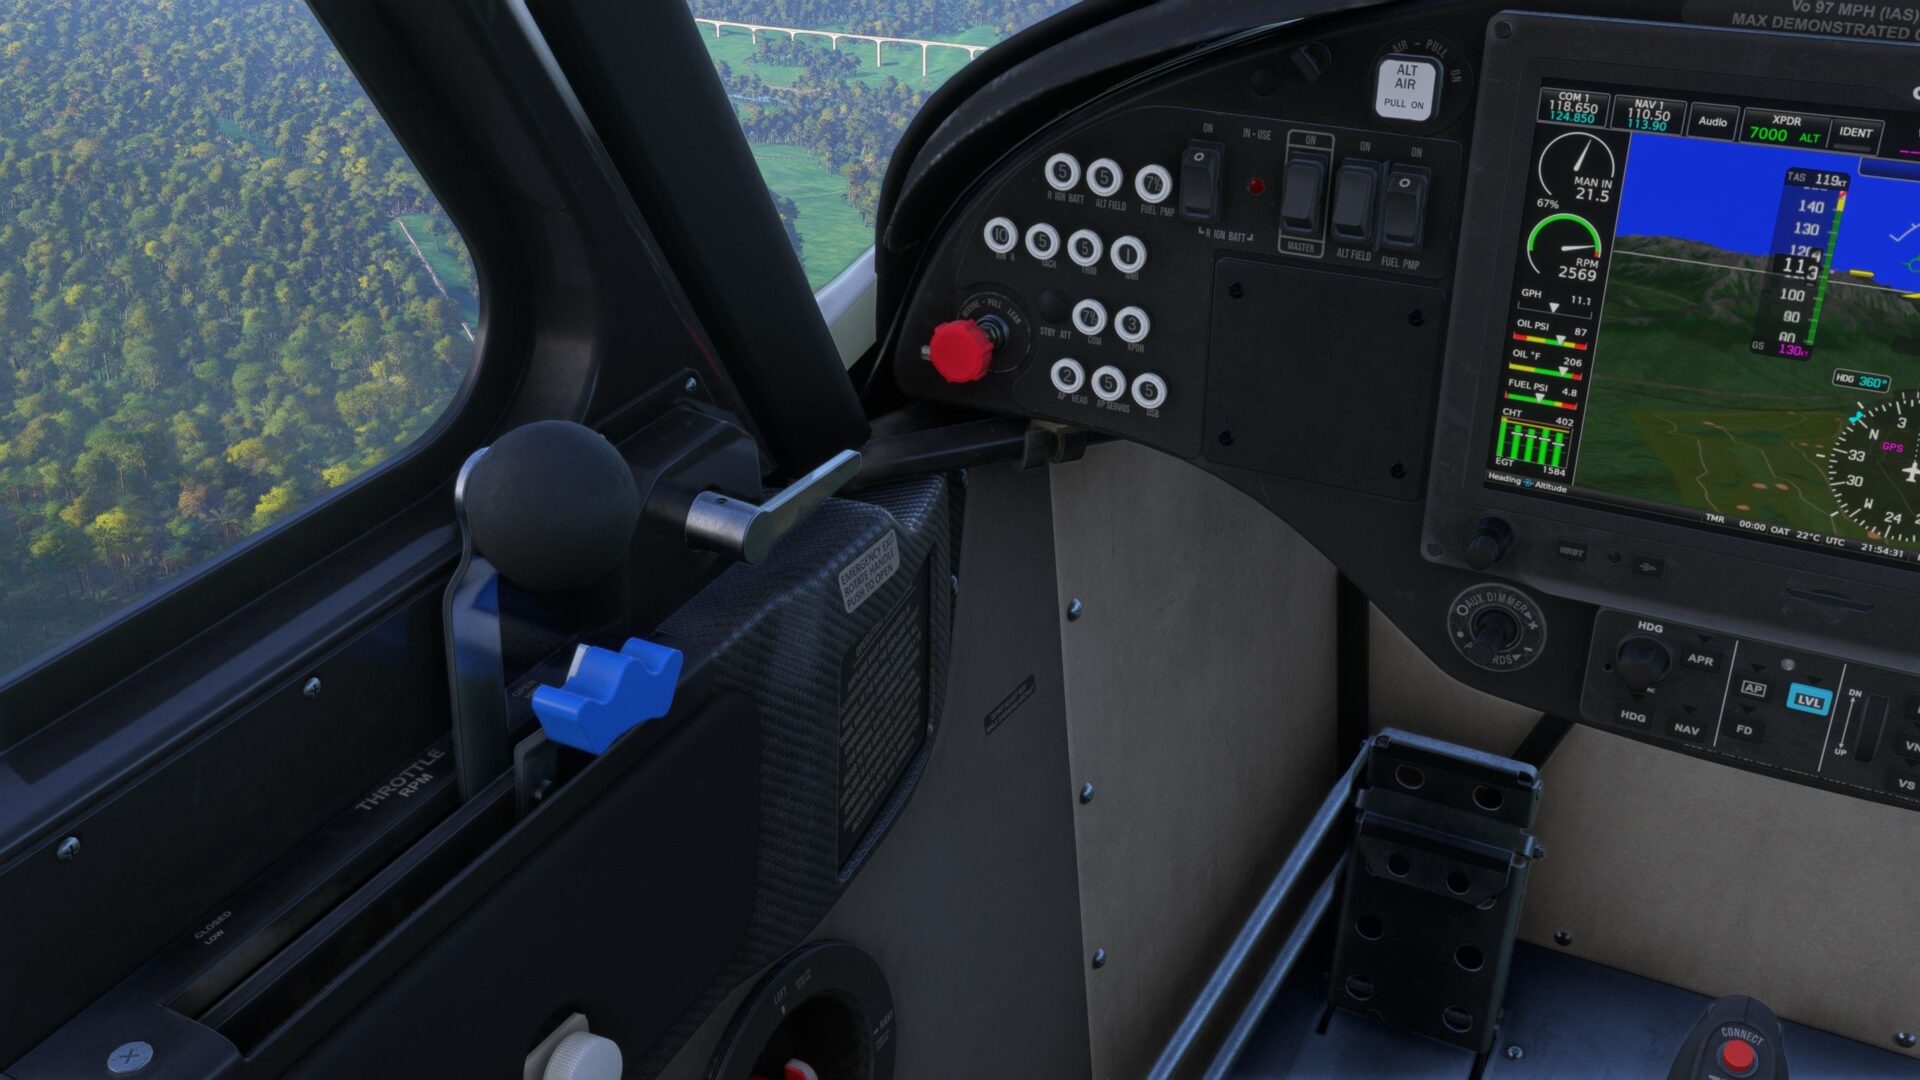
To start your takeoff roll, disengage the parking brake with RB+X (it’s the same combination of buttons to reengage it after you land). Check that the flaps are set in take-off position (33%) by hovering the mouse of the controller dot on the big lever on the top left of the cockpit.
Then increase the throttle all the way to 100% by holding A. You’ll see this in the “Main in” gauge in your avionics.
As the aircraft starts to roll, you may need to steer to keep it in the middle of the runway. You can do this with the left and right triggers, which control your rudder. Tapping lightly on them will be enough, without overcorrecting.
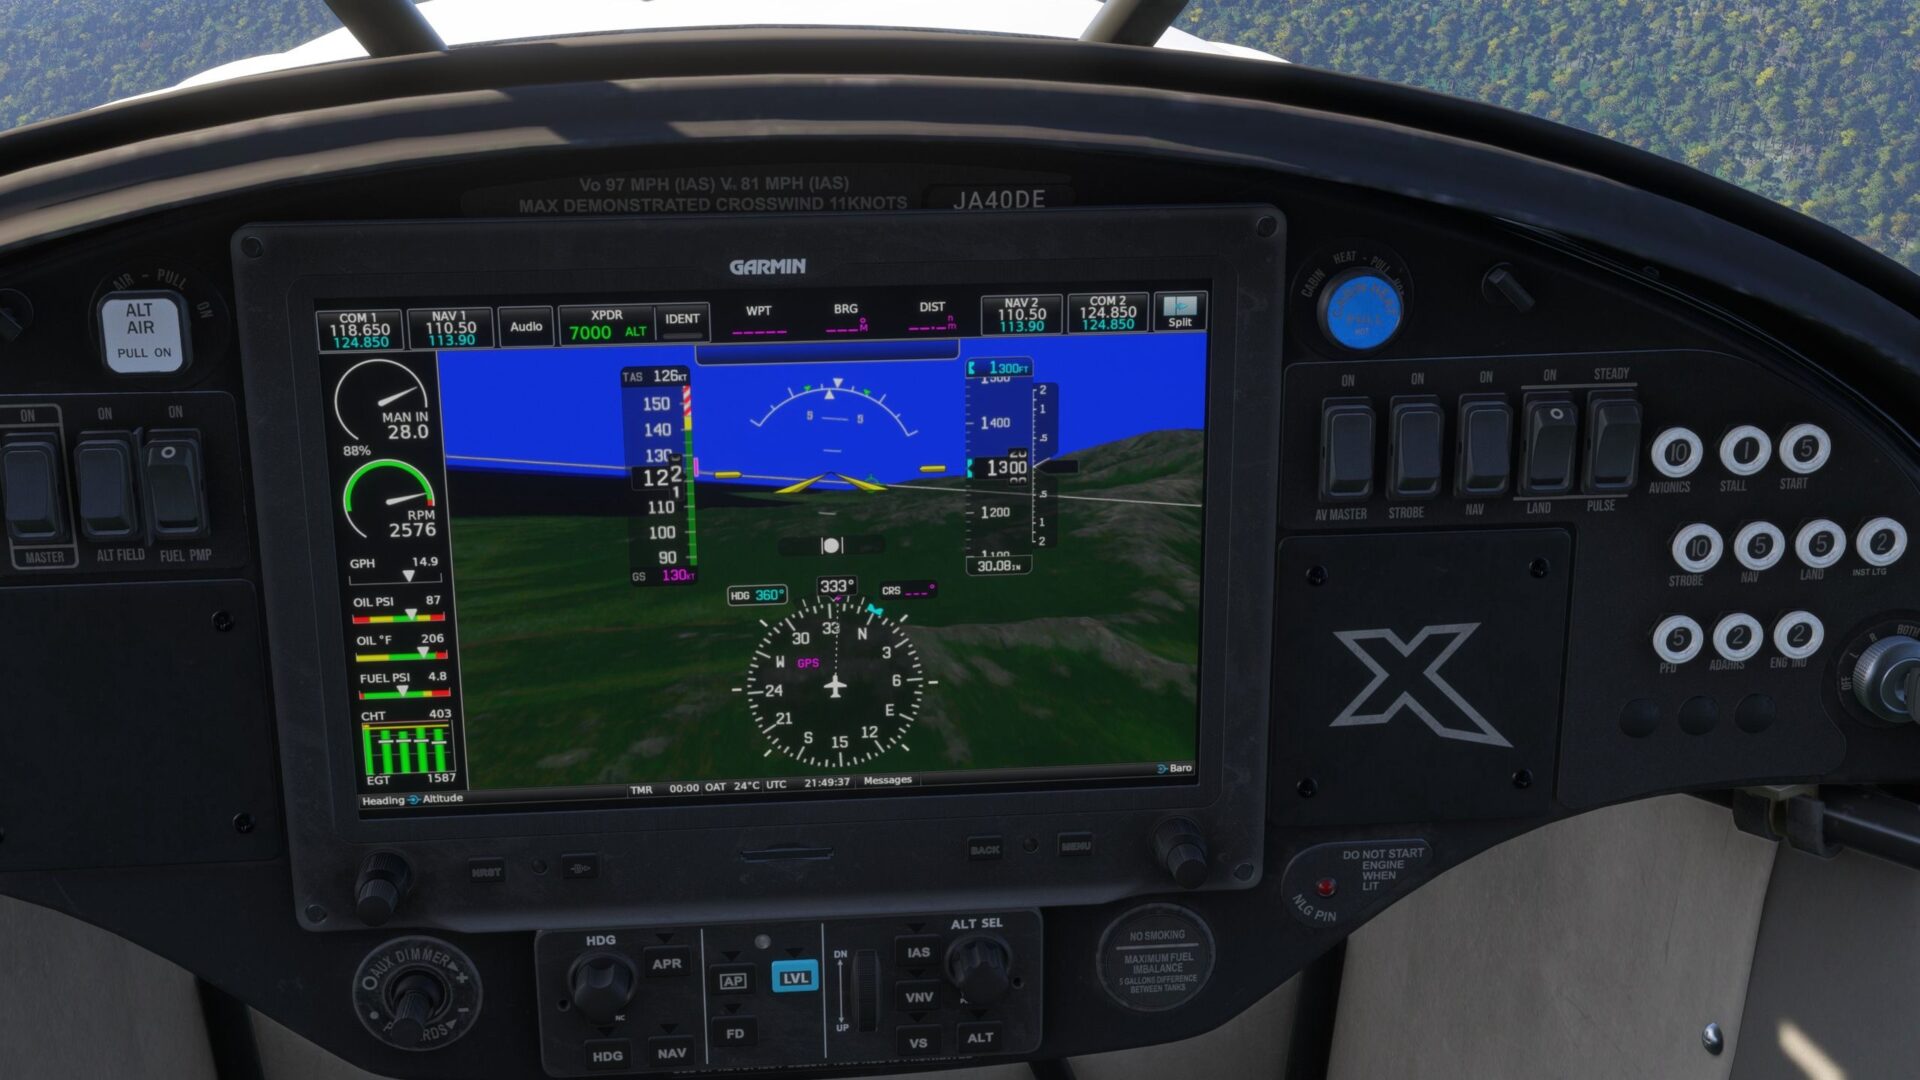
Your airspeed in knots is visible on the speed bar to the left of the digital display in front of you (MFD, or Multi-Function Display). Once you’re above the red bar (you’ll see a small R on top of it), you have enough airspeed to fly, so you can take off (rotate) by pulling slightly on the left stick. Be gentle, as the Cub is a sensitive aircraft.
When you reach the top of the white bar, you can fully retract the flaps by pressing up on the D-Pad. Incidentally, the flaps are aerodynamic surfaces that extend from your wings. Tehe, the more they’re extended, the more lift you’ll have at slower airspeeds, but you’ll also have more drag. They’re mostly used during take-off and landing.
Once you have taken off, you can reduce your throttle a bit by holding A. Aim to remain in the green of your speed tape. If you go into the lower red part, you’ll stall and lose lift. If you go into the upper yellow and red part, you’re overspeeding and risk breaking your aircraft apart.
Of course, having deactivated damage, this is not an actual concern, but you may as well learn the right way.
Your basic directional controls are on your left stick. By pulling it toward you, you’ll climb. By pushing it away from you, you’ll descend. Keep in mind that doing so reduces and increases your speed, respectively, so you may also need to control your throttle accordingly to stay in the green part of the speed tape.
Again, be gentle. Your altitude above sea level is indicated by the altitude tape on the right of the MFD screen.
To turn, you can tilt your left stick to the left or right. This will roll your aircraft and initiate a turn in that direction. In the Cub, a 10-20-degree roll is plenty for a nice, steady turn.
You don’t need to keep your stick tilted. Once you have reached the desired roll angle, you can center the stick, and the aircraft will hold that angle. You can tilt the stick in the opposite direction to go back to level flight and end the turn.
If you want to turn faster, you can pull the stick toward you slightly.
If you want to be fancy, you can practice “coordinated turns,” which you achieve by pulling on the stick slightly to keep your nose level with the horizon, and use the rudder (the triggers) slightly in the direction of the turn to avoid slipping.
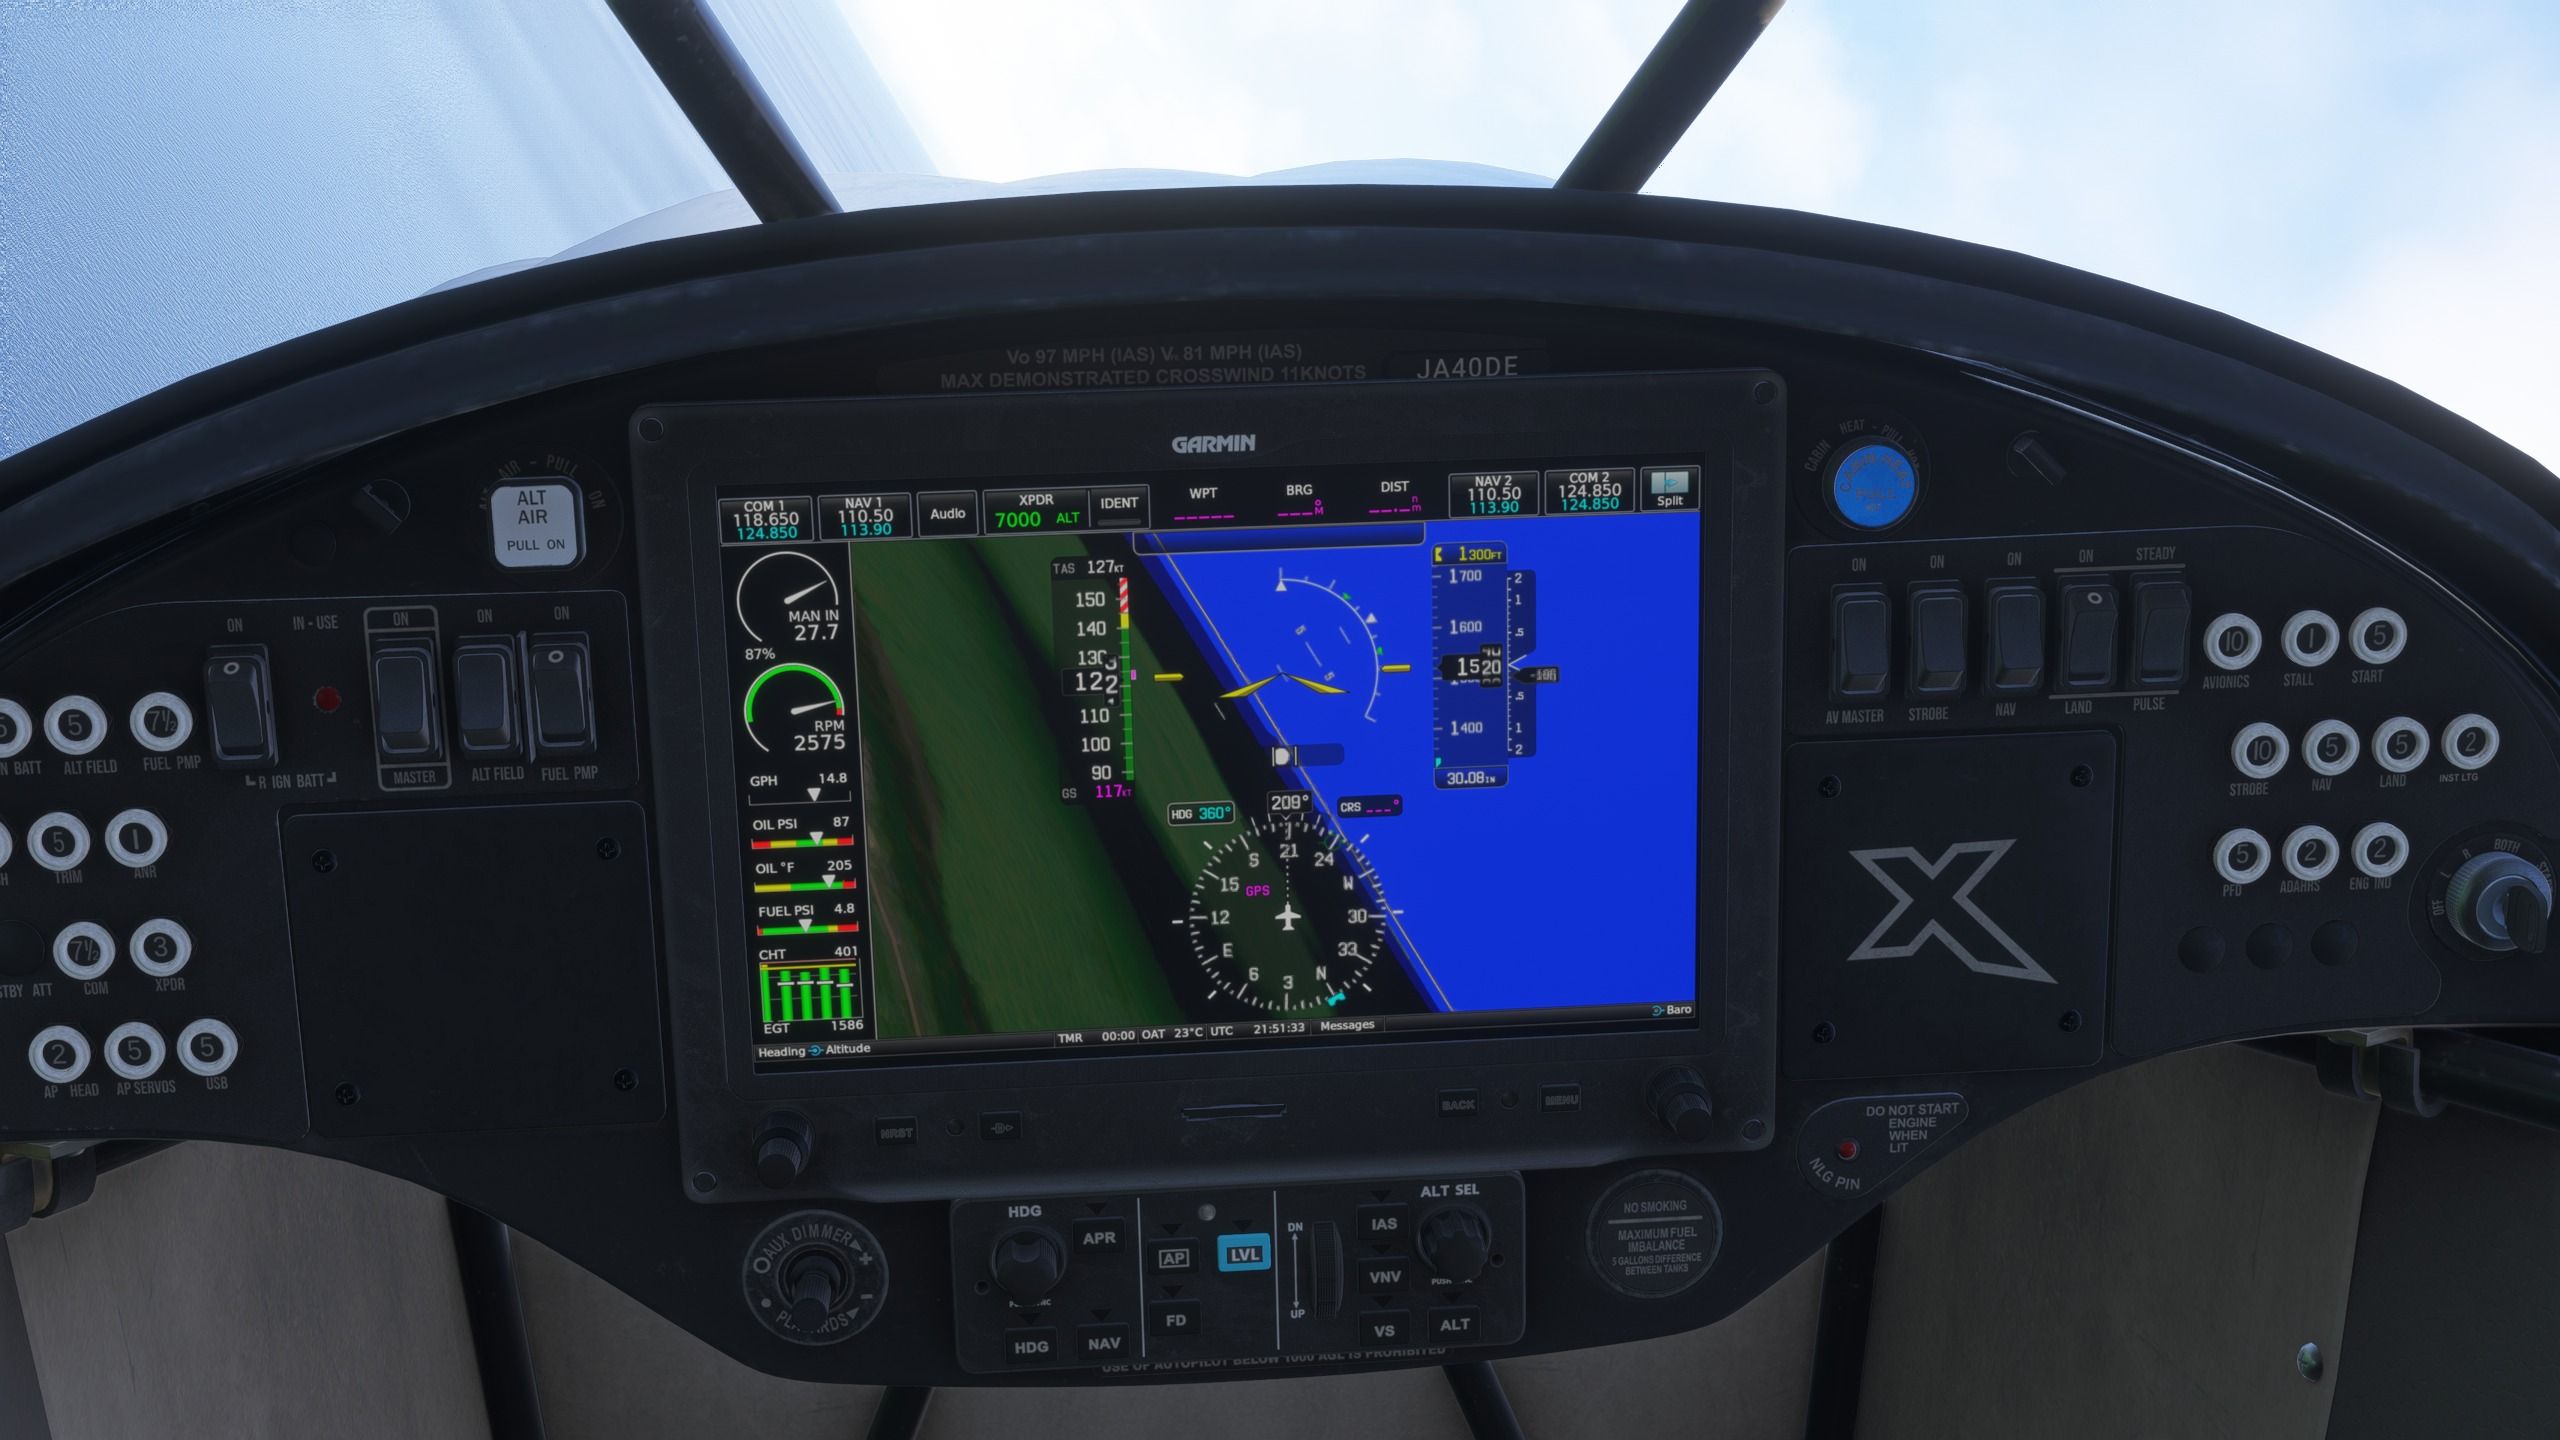
To see if your turn is coordinated, you can look at the small circle in the middle of your avionics screen. If it’s centered, your turn is coordinated. If it’s leaning to the side, you’re slipping.
That being said, the Cub is such a forgiving plane that you don’t need to worry too much about this.
Another slightly advanced but relevant concept is your mixture. You can increase (enrich) it with the “H” key on your keyboard and decrease (lean) it with the “Y” key. This is usually not mapped to your controller.
The mixture governs the percentage of fuel and air injected into your engine. It needs to be full rich (press H until you see the red knob pushed all the way forward) when you start your engine, when you take off, when you land, and when you climb.
You can lean it when you’re just cruising around. The higher you are, the leaner it can be. To find the best setting for your altitude, lean your mixture (by gently tapping Y) until you see the “EGT” number on your screen peak. After you pass that threshold, it will start decreasing (you’ll also see the RPM drop sharply and hear it in the sound of the engine as well), enrich the mixture again by tapping H until you’re again at the peak. It’s a bit of an art.
That being said, if you’re just flying around at low altitude to spot dinosaurs, you can leave it on full rich and not worry about it. I also won’t hold it against you if you turn on the “Auto Mixture” option in the Assistances.
Secondly, you can adjust your propeller pitch (the lever with the blue top in your cockpit) with G to increase it and T to decrease it. It needs to be at its maximum when you take off.
You should fine-tune your propeller pitch after setting your power. To do so, look at your RPM gauge. On the NXCub, it should be on 2,700 (the maximum) on take off, around 2,600 for landing, between 2,500 and 2,600 when climbing, between 2,300 and 2,400 in cruise (when flying level), and between 2,200 and 2,300 when descending.
That being said, the NXCub is again an extremely forgiving aircraft, so at least as a beginner, just flying around for fun, as long as you don’t go into the red of the RPM gauge (besides on takeoff), you’re fine.
Of course, if you have deactivated damage in the assists, this is not a concern, but again, you may as well learn the right way.
Lastly, we have the trim. You’ll notice that when you’re flying straight and level, your nose will tend to go up and down on its own depending on your power setting, making you climb and descend.
You can correct this by setting your trim until your nose doesn’t move and stays where you put it. To set your trim up, you press RB and pull the right stick toward you at the same time. To set your trim down, you press RB and push the right stick away from you. Of course, when you change your power setting, you’ll need to trim again.
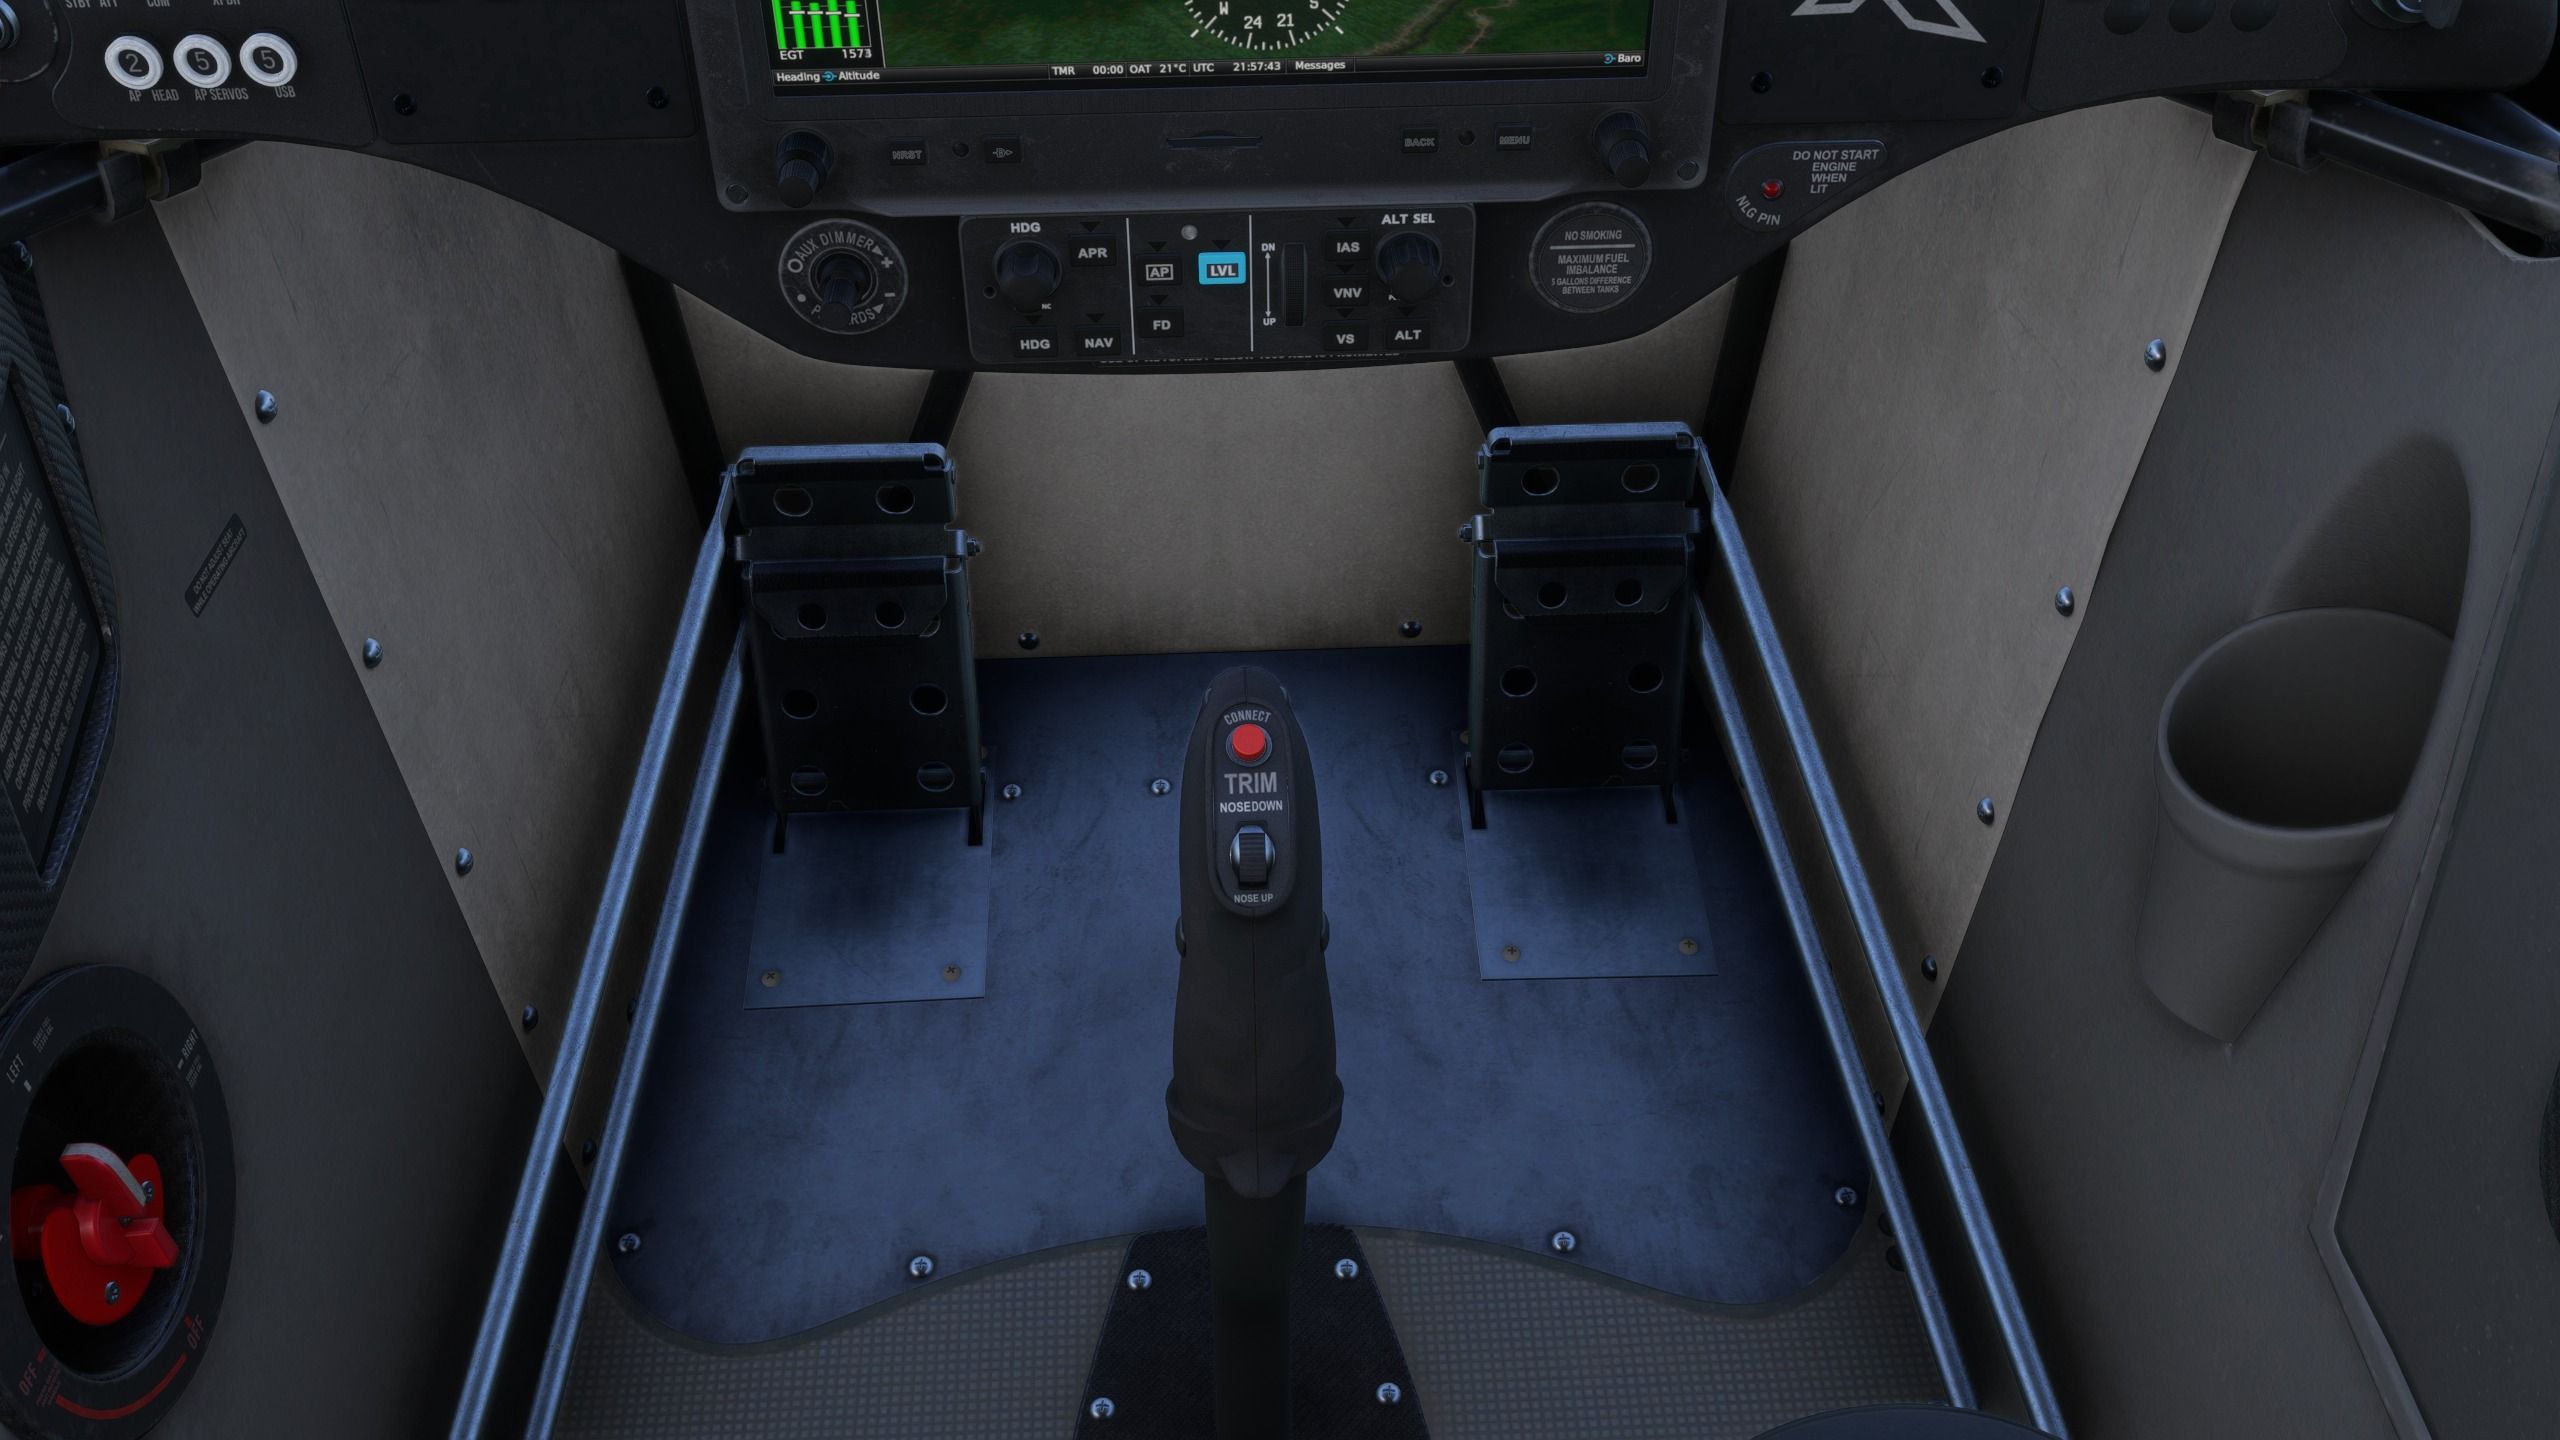
If you don’t want to be bothered, you can set AI Auto-Trim in the Assistances menu. You have now learned literally everything you need to know to fly your aircraft, so it’s time to talk about landing.
Incidentally, to find your way around and places to land, click on the “Split” icon on the top right of your avionics screen. That’ll bring up the map. You can zoom in and out with the “+” and “-” icons
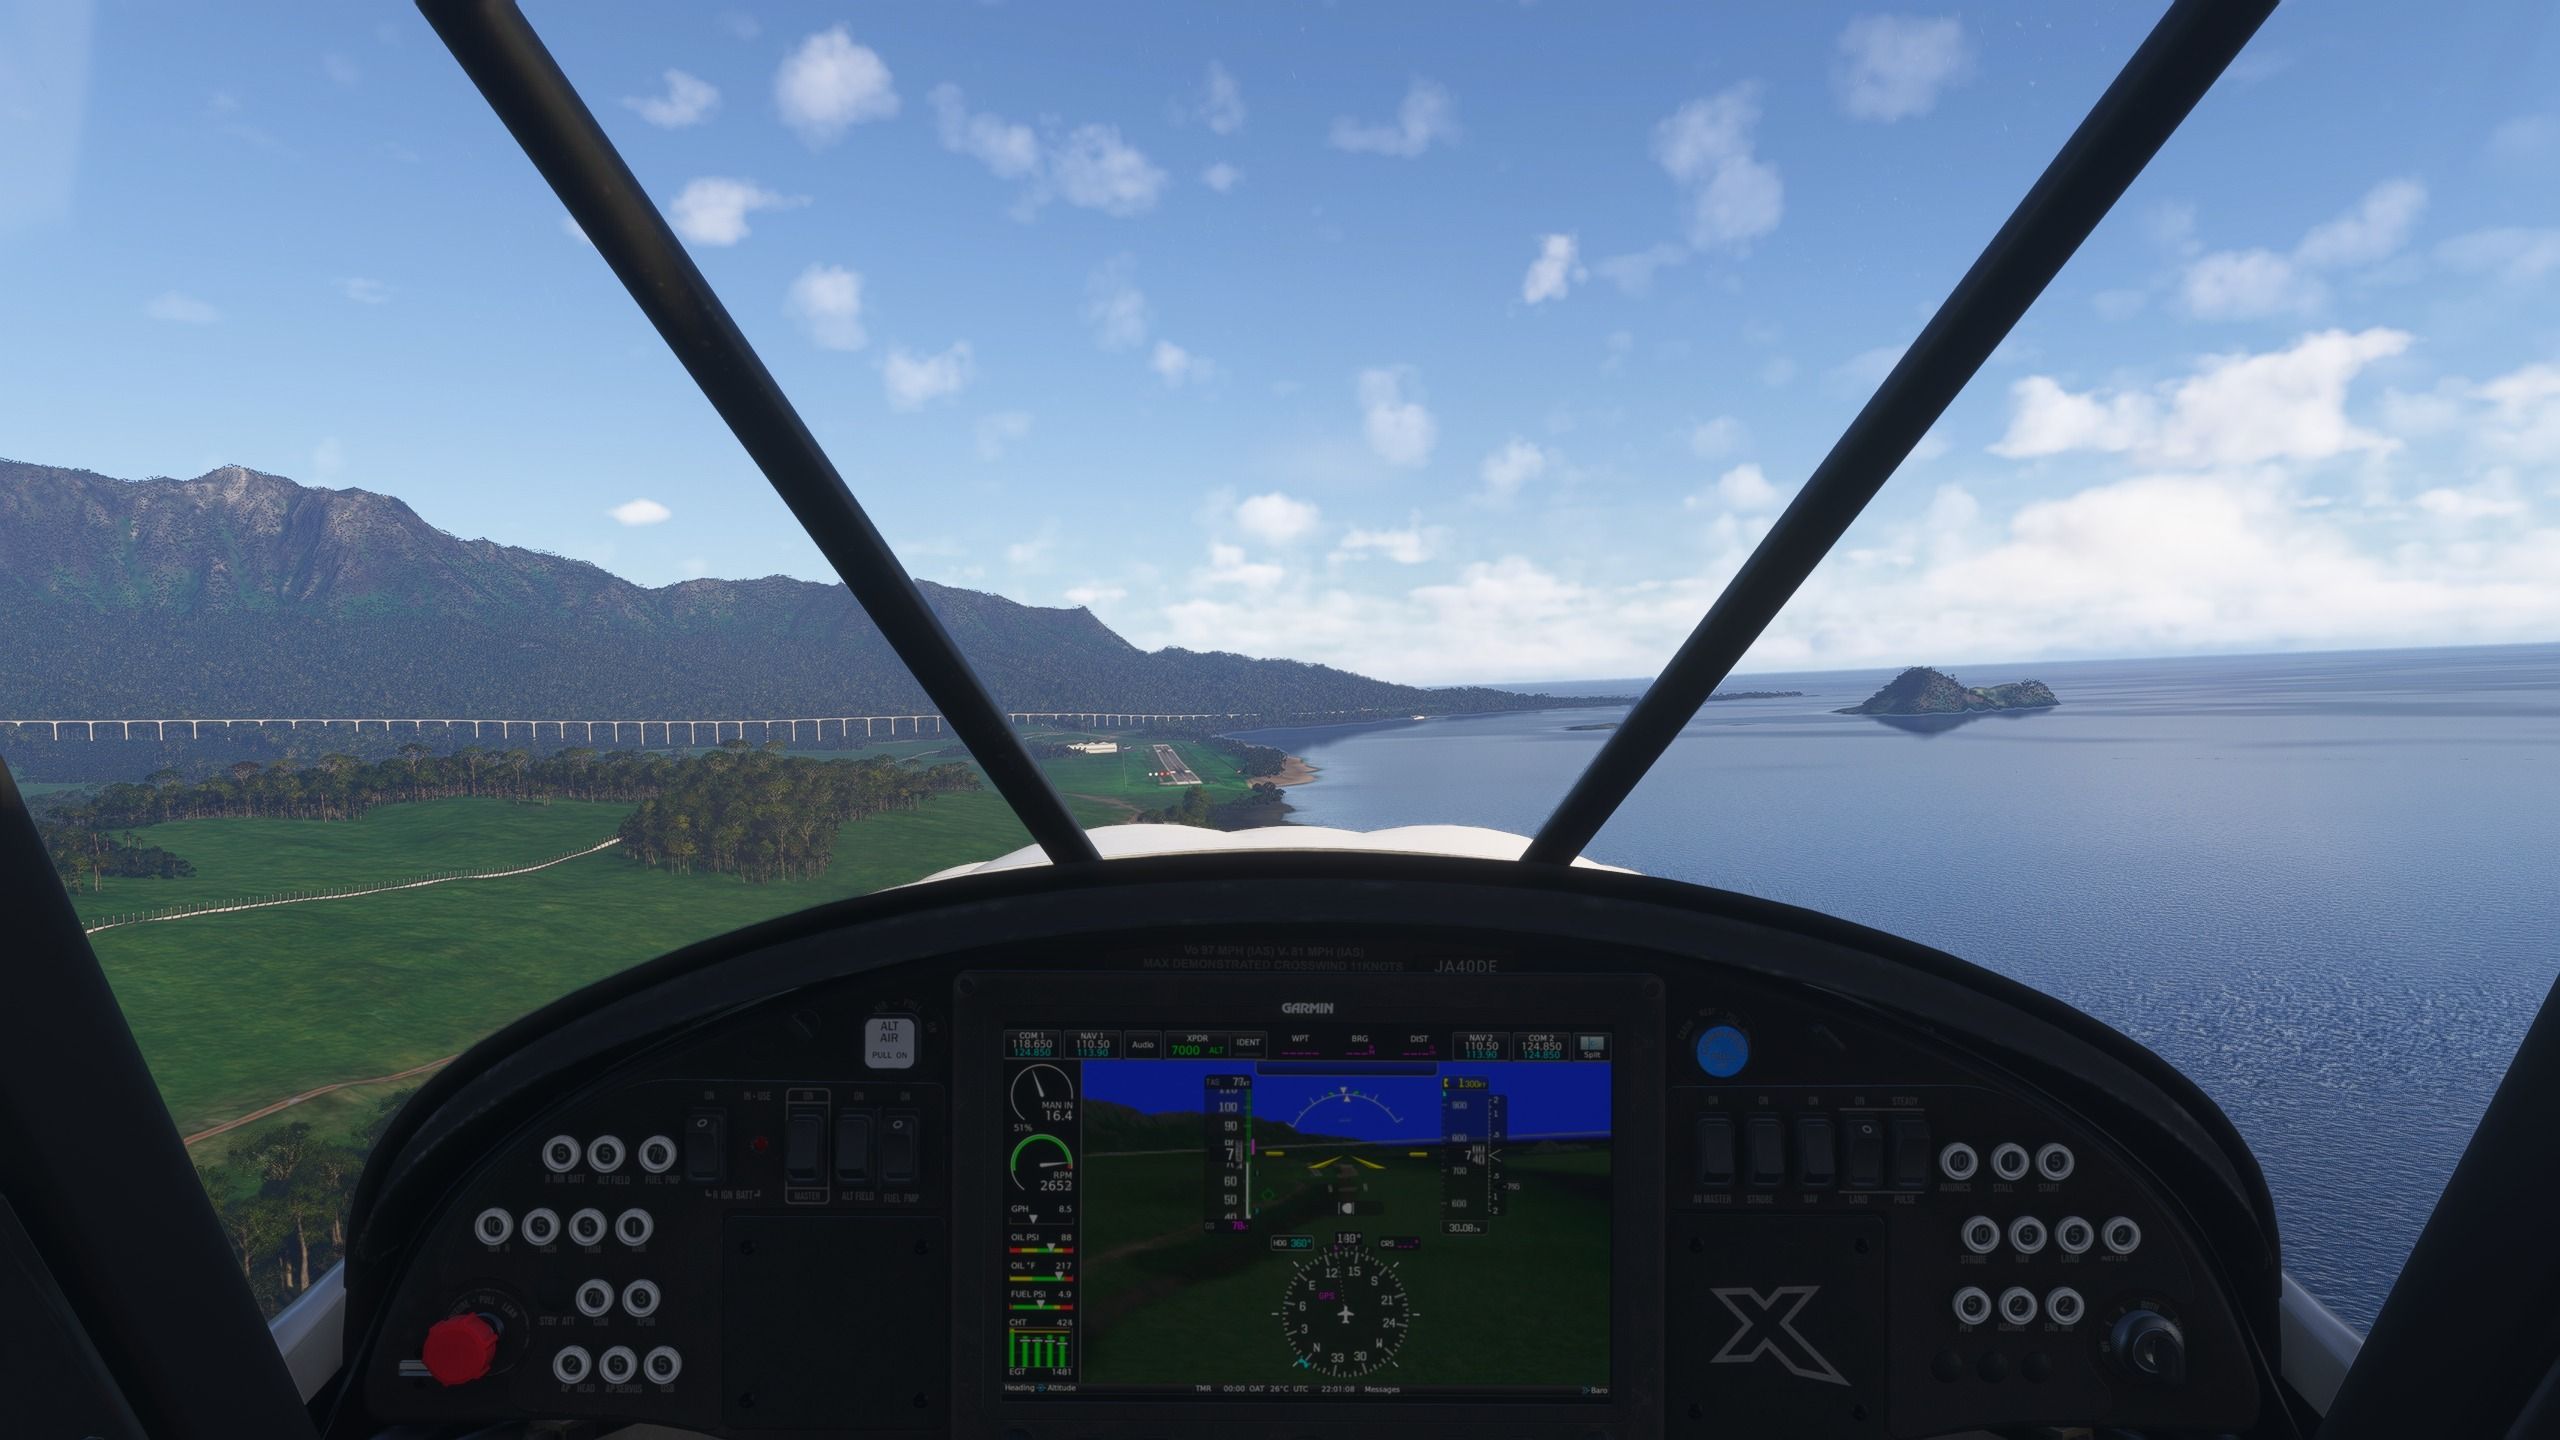
Line up with an airstrip at a distance that lets you descend toward it at a rather shallow angle, then decrease your power so that you’re in the white part of the speed tape.
Set full flaps by pressing down on the D-pad 3 times, and your mixture to full rich by holding down on “H”, then fine-tune your power so that you achieve a steady rate of descent without dropping your nose with the stick too much, and set your propeller pitch so that you have about 2600 rpm.
The best technique to achieve a stabilized approach is to use your power (less power, you descend, more power, you climb) instead of the stick. Between 50 and 70 Knots is where you should aim to be, and try to keep it steady.
Most runways that aren’t small dirt strips will have four lights to the left of the threshold. These are the PAPI lights. If you see two white lights and two red lights, your descent trajectory is perfect. If you see more red lights, you’re too low and should increase power. If you see more white lights, you’re too high and should decrease your power.
If you’re landing on a paved runway, you should aim to touch down on the big stripes indicating the landing zone. If the runway is not paved, you should aim near the closest threshold, but not too close. Give yourself some leeway.
When you pass the threshold and you’re very close to the ground (about 10 feet), you need to “flare” or raise the nose by pulling on the left stick slightly so that your nose gear is higher than your main gear, and your descent rate will decrease, then cut the power by holding down the A button.
The aircraft will settle on the main gear first, and then you can gently lower the nose gear to the ground by pushing gradually on the left stick. After that, apply the brakes with the X button and the rudder with the triggers to stay in the middle of the runway and reach a full stop.
Incidentally, the best way to line up with a runway is to fly over it by following its direction, then turn 90 degrees to the left or to the right, wait a few seconds, and turn 90 degrees again in the same direction to fly parallel to the runway. After you have passed the runway and achieved enough distance, turn 180 degrees in the same direction as the previous turns, and you should be pretty much spot on.
Usually, you should try to land and take off into the direction of the wind, but the Cub is so capable that you don’t need to worry about that, for now.
It’s worth mentioning that the NXCub is a bush plane, which means that you really don’t need a runway. You can land pretty much anywhere you find enough unobstructed ground that’s fairly flat, which is ideal for finding interesting places and then exploring on foot.
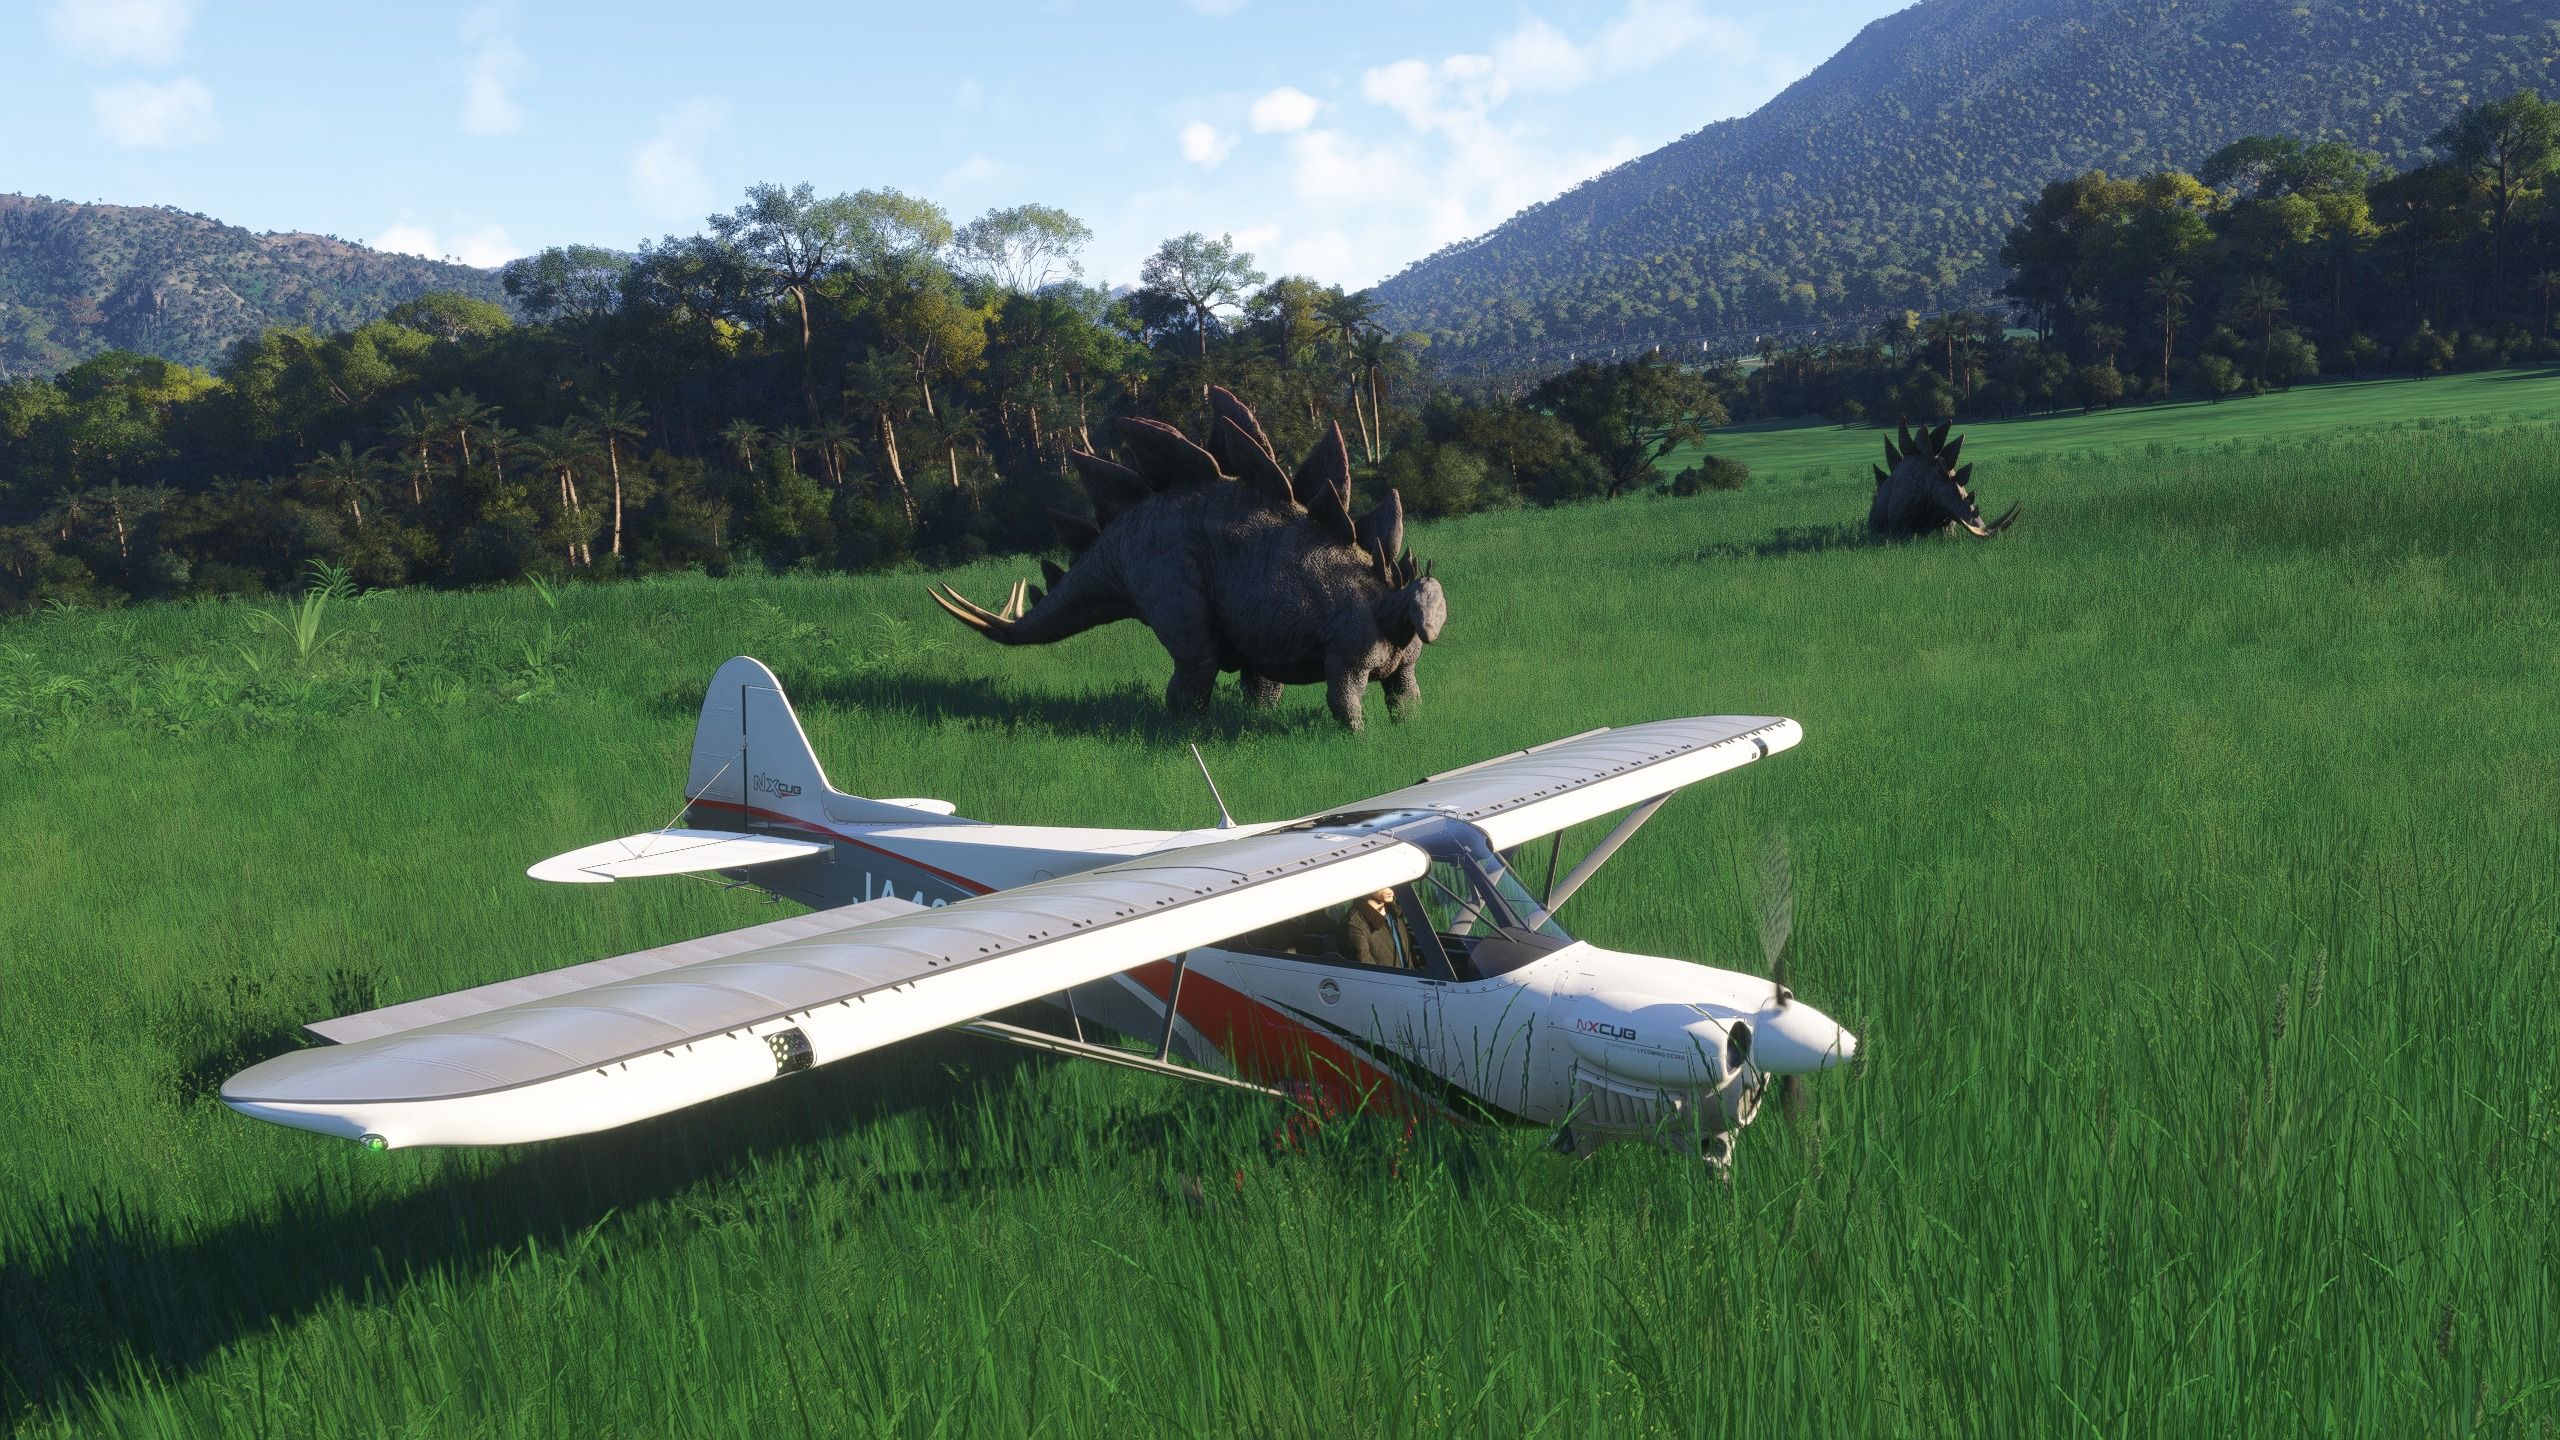
Just be careful about landing as softly as you can when you do it out in the bush, although having turned off damage should give you plenty of peace of mind.
Once you have landed, you can apply the parking brake with RB+X.
After parking, you can press LB+B to leave the aircraft and explore on foot. You can go as far as you like from the aircraft, and pressing LB+B again will bring you back into the cockpit regardless of where you are. Keep in mind that holding the right trigger will let you jog a little faster.
To take off again, you can repeat the technique mentioned at the beginning of this guide. If you have very little room, you can attempt a full flaps take-off (the NXCub is a very capable STOL aircraft, able to perform Short Take Off and Landing) by leaving the flaps in the same position you used when landing.
That will let you take off very quickly, as soon as your airspeed passes 40 knots.
Now, let’s talk a little bit about the basics of the autopilot, which can certainly be useful to enjoy your dinosaur spotting without needing to control the aircraft at all times.
The NXCub has a rather capable autopilot unit located just under the MFD screen. Contrary to popular belief, the autopilot is a rather complex system and not really just a “press a button and the plane flies itself” arrangement.
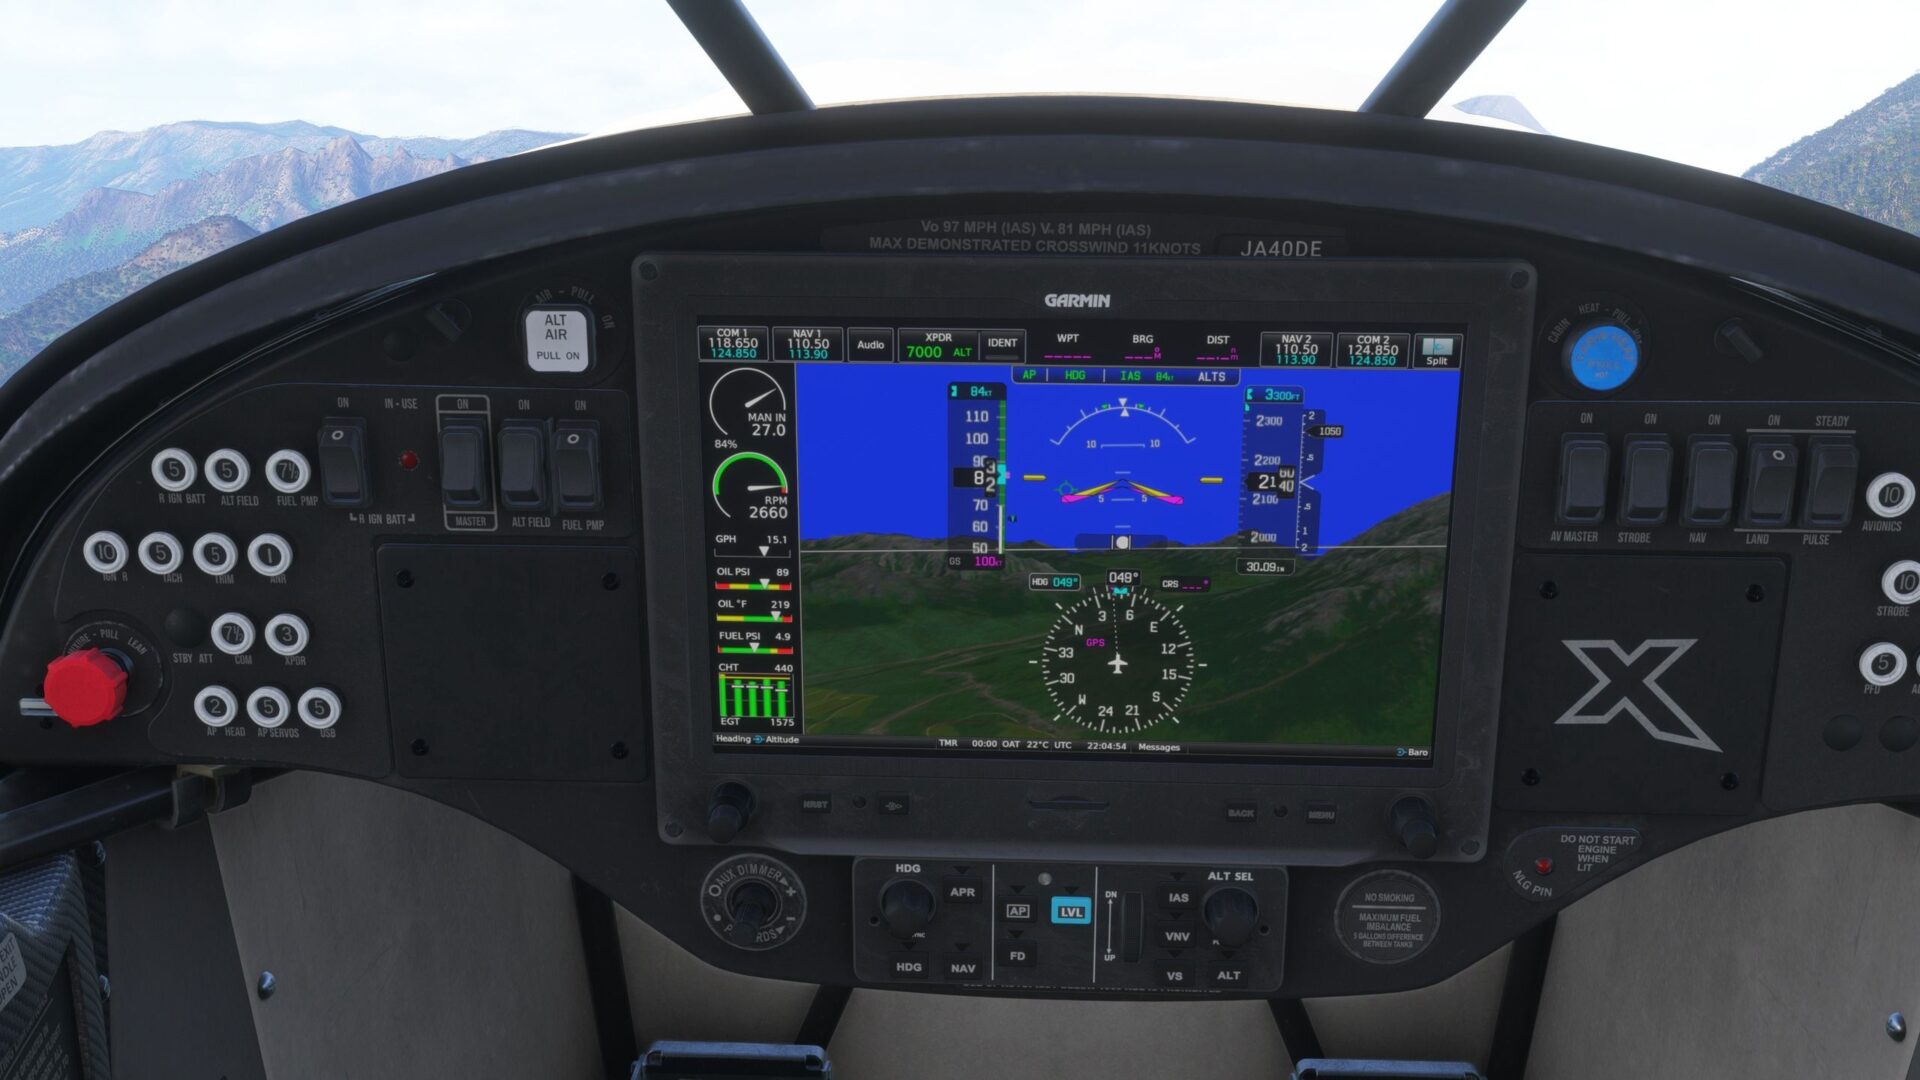
You can activate the autopilot with the “AP” key. You’ll notice three green indicators at the top of the MFD screen. “AP” indicates that the autopilot is active. “ROL” and “PIT” indicate that the autopilot is controlling the roll and pitch of your aircraft to maintain the current angles.
That’s the most basic mode, and when the autopilot is engaged, you won’t need to worry about the trim, as it’s automatic.
On the other hand, most general aviation aircraft don’t have an autothrottle, so all power controls (power, mixture, and propeller pitch) remain in your hands.
For something a bit more advanced, you can engage Heading mode. With your autopilot already engaged, use the “HDG” knob to select the heading you want to fly, indicated by a blue bracket on the edge of the compass and by a numerical value just above it and to the left.
Then you can press the “HDG” button, and you’ll see the green “ROL” change to “HDG” on the MFD. The aircraft will turn and then fly straight on that heading.
Your autopilot can also control your altitude, albeit this is slightly more complex. Use the “ALT SEL” knob to select the altitude you want to fly (above sea level), indicated by a blue bracket on the altitude tape and by a numerical value on top of it.
It’s worth mentioning that clicking the “ALT” button at this point will simply level off at your current altitude. You need to actually tell the autopilot how to get to the altitude you want if you want to climb or descend.
You have two ways to do that: by setting an airspeed or by setting a vertical speed.
By clicking on the “IAS” button (in other aircraft, the same button may be labeled “FLC”), a blue bracket on the speed tape and a numerical value on top of it will lock your current airspeed. The autopilot will climb or descend, trying to maintain that indicated airspeed.
This means that if you increase your power or lower that indicated airspeed (with the “up/dn” wheel to the left of the IAS button), your aircraft will climb. If you decrease your power or increase the selected indicated airspeed, the aircraft will descend.
The second way is by clicking the “VS” or “vertical speed” button. When you do so, you need to then use the “up/dn” wheel to select a vertical speed of climb or descent in feet per minute.
The aircraft will try to achieve that by setting a climb or descent angle that fits your airspeed at any given time. Of course, it’s up to you to control the power so that such a climb or descent rate can be achieved without stalling or overspeeding.
Whichever method you use, your aircraft will level off when it reaches the altitude you have set. Of course, while it’s climbing or descending, you can still operate the heading knob to control your direction. By clicking “HDG” and “ALT” again, the autopilot will revert to the basic roll and pitch modes.
The last tidbit of information I’d like to convey is your fuel management. The NXCub has two fuel tanks, left and right. You can see how much fuel is left in each tank by being in “split” mode of your MFD and clicking on the narrow bar at the bottom of the map, where you can see the “Map” icon. Then select “Engine” and click on “Fuel Calc”
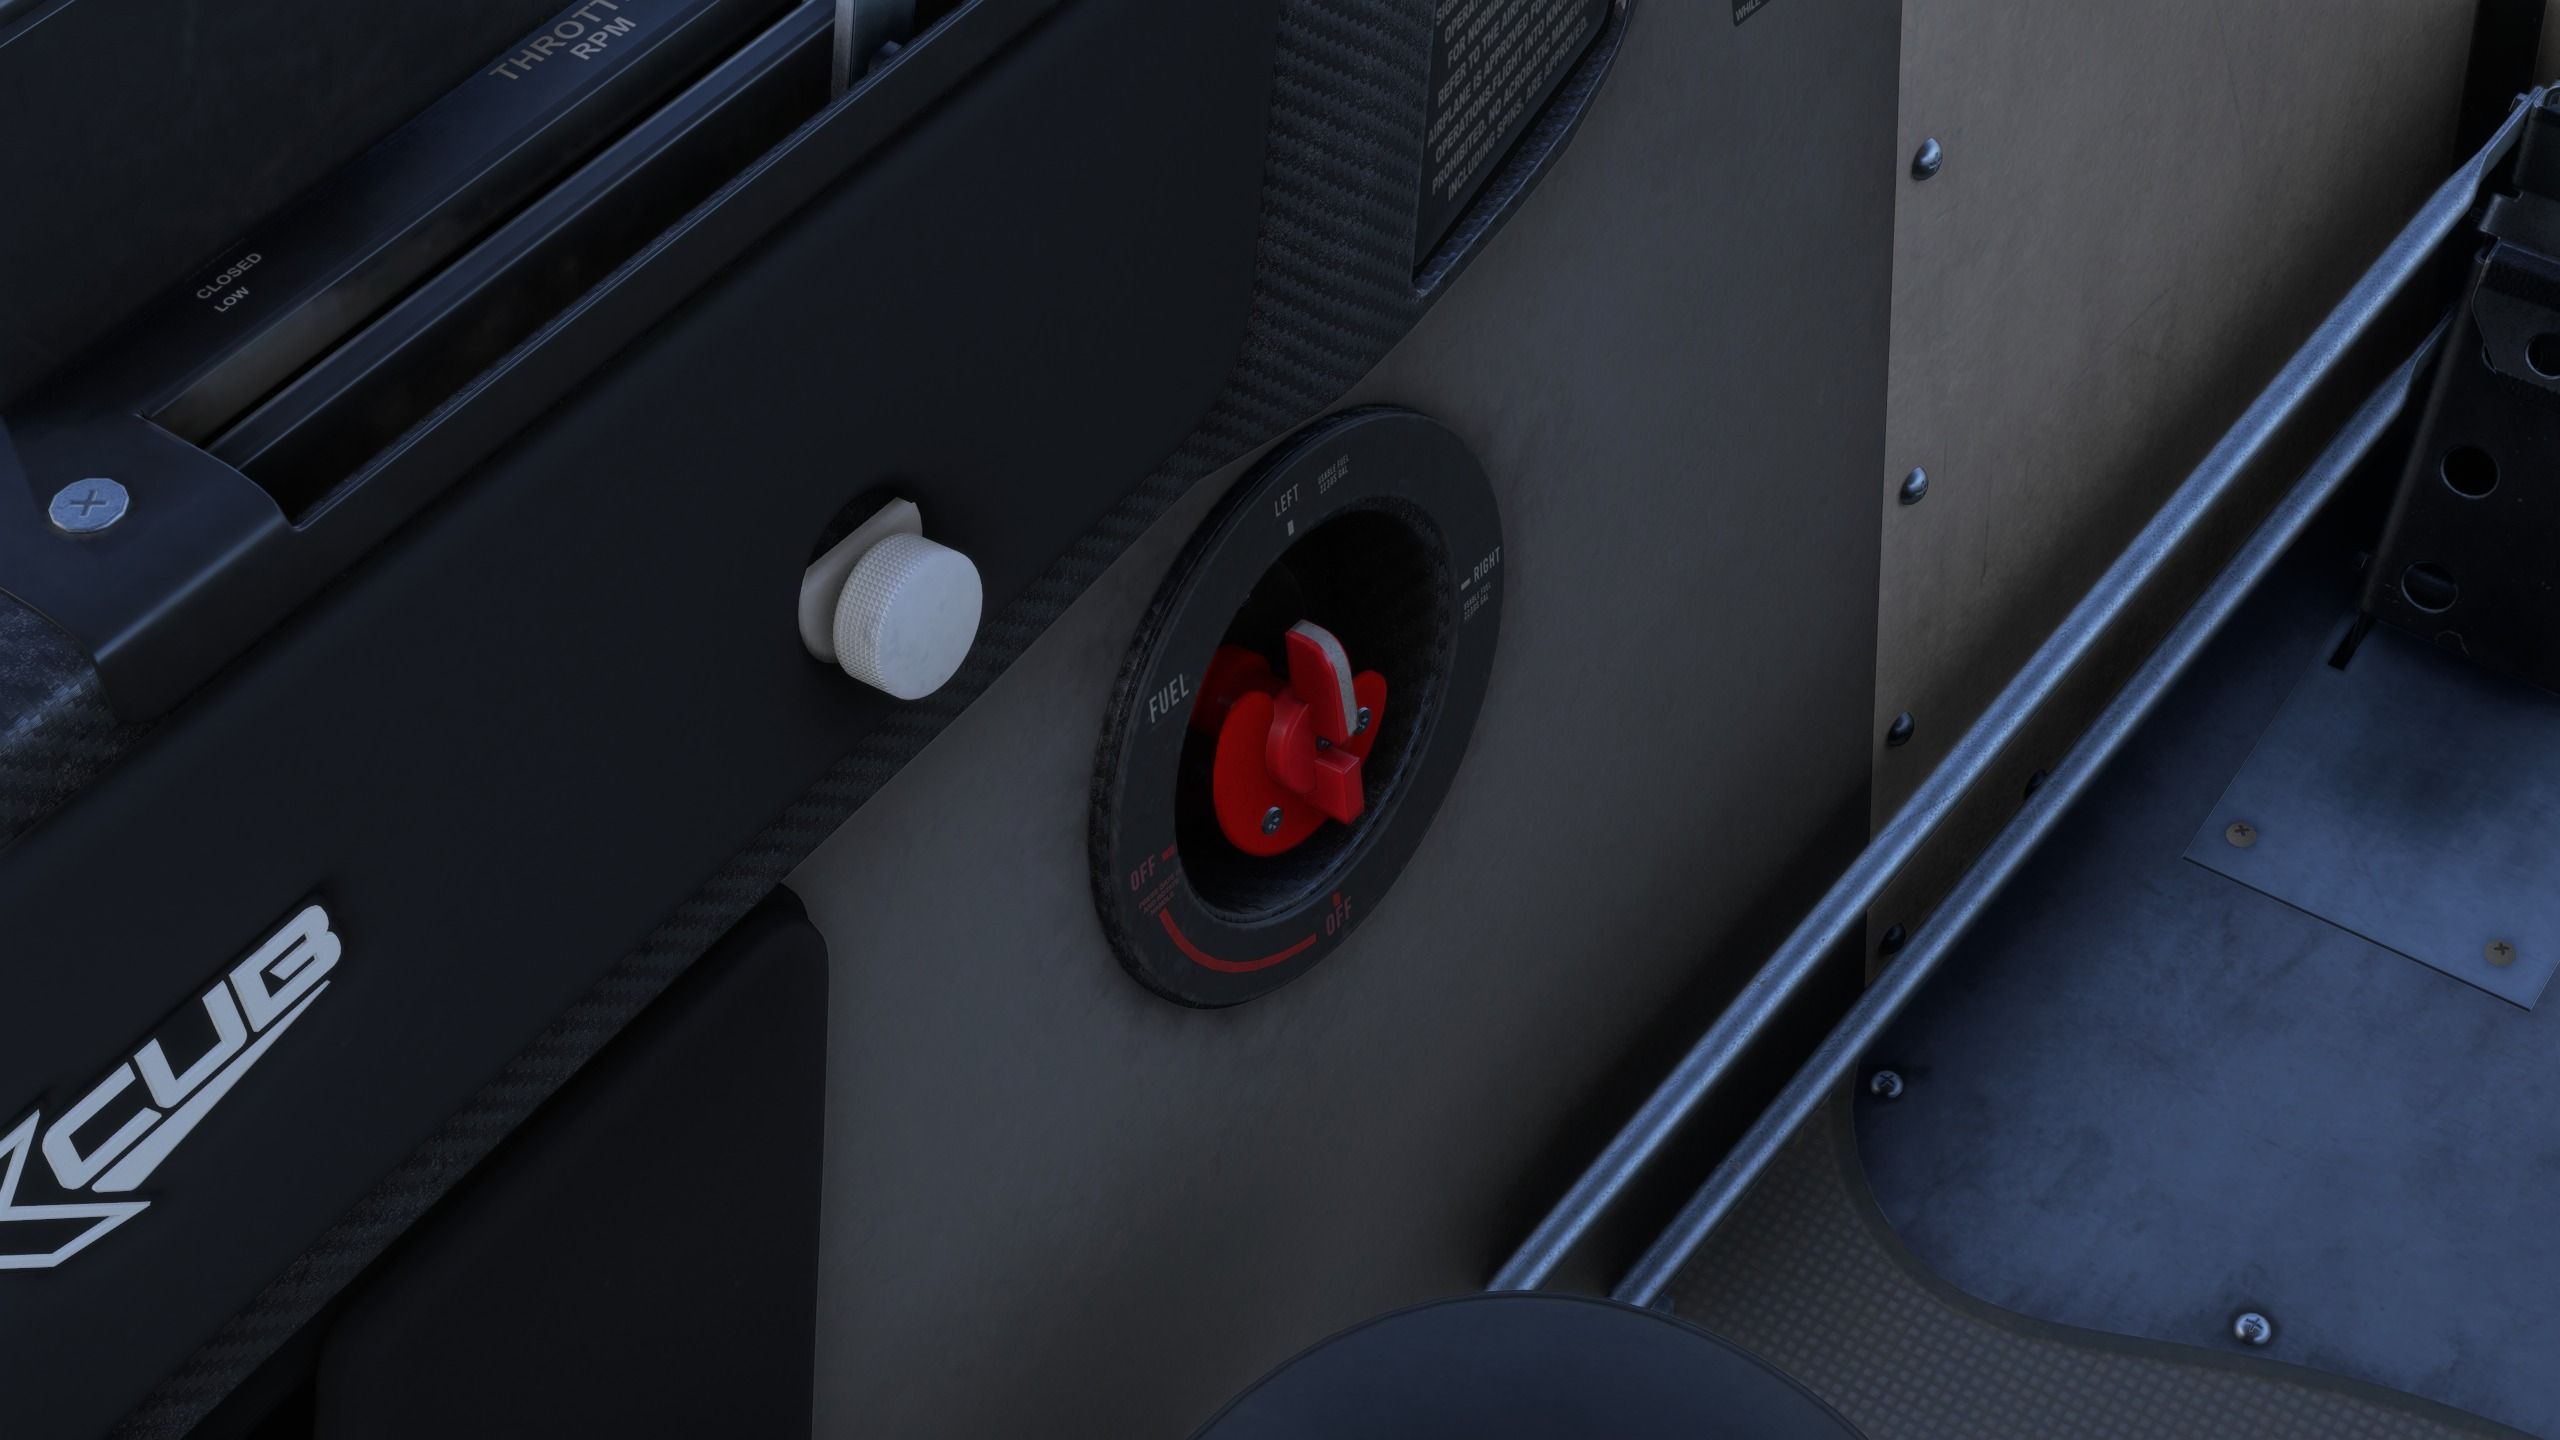
It’s good practice to periodically switch the tank in use between left and right by operating the red selector on the left of the cockpit. Doing so every 30 minutes will ensure that the quantity of fuel remains similar in both tanks. A big difference will negatively affect your balance.
Now you’re ready to explore the archipelago to your heart’s content. When you master the NXCub, you will pretty much know the basics to move to larger planes like the Textron Aviation Beechcraft King Air 350i (which incidentally comes with Jurassic World liveries), and it is a good choice if you want to fly between Isla Sorna and the other islands, which are fairly far apart, or between the archipelago and the continent.
Incidentally, certain parts of the islands, including the main street and the control center on Isla Sorna, are easier to access on a helicopter. That being said, helicopters are extremely challenging for novices, even with all assists active, and even more so with a controller, so learning to fly one is beyond the scope of this guide.
You’re better off using the NXCub’s short landing capabilities, and as you learn, you’ll be surprised by where you’ll be able to land. That being said, if you’re interested in learning to fly helicopters, you’ll find plenty of in-depth tutorials on YouTube, while Helisimmer.com is likely your best bet for dedicated in-depth information.
Before we move on to something completely different, I’m going to teach you one last trick, which is basically a cheat. If you want to go somewhere but you can’t manage to land, either because there’s no room or because it’s too challenging, you can use the Slew mode.
Press Shift+Z, and your aircraft will not be controlled by physics anymore. The simulation will pause, and you can simply use the controller to position anywhere you want in the air or on the ground. You can even travel great distances quite fast. Do you want to explore the control room, but you don’t have a helicopter and don’t want to walk? With the Slew mode, it’s a simple task.
Before we wrap up, let’s talk about hardware.
To enjoy Jurassic World: Archipelago, you’ll need at the very least the minimum specs demanded by Microsoft Flight Simulator 2024 (reproduced below), but I wouldn’t recommend aiming that low. You’d have a bad time.
- Requires a 64-bit processor and operating system
- OS: Windows 10
- Processor: AMD Ryzen 5 2600X or Intel Core i7-6800K
- Memory: 16 GB RAM
- Graphics: Radeon RX 5700 or GeForce GTX 970
- DirectX: Version 12
- Network: Broadband Internet connection
- Storage: 50 GB available space
- Additional Notes: Network Speed of 10 Mbps Bandwidth
The recommended specs below are definitely a more reasonable approach.
- Requires a 64-bit processor and operating system
- OS: Windows 10
- Processor: AMD Ryzen 7 2700X or Intel Core i7-10700K
- Memory: 32 GB RAM
- Graphics: Radeon RX 5700 XT or GeForce RTX 2080
- DirectX: Version 12
- Network: Broadband Internet connection
- Storage: 50 GB available space
- Additional Notes: Network Speed of 50 Mbps Bandwidth
Jurassic World: Archipelago isn’t suitable for operation with the more complex airliners, unless you want to ferry passengers to San Jose Juan Santamaria International Airport, which is included in the package. Yet, don’t expect to see dinosaurs there, besides the posters in the VIP terminal.
The aircraft that you’ll fly over the islands are pretty light in terms of hardware demands, so you’ll be fine.
If you want to upgrade the experience further, I’d recommend investing in RAM (especially if you want to use the simulator while keeping your browser and other programs open) and a graphics card with at least 16 gigabytes of VRAM. Microsoft Flight Simulator 2024 loves to gobble your VRAM like a delicious treat.
As I mentioned above, you’re fine with an Xbox controller or similar, but if you enjoy flight simulation and want to enhance your experience, you have options.
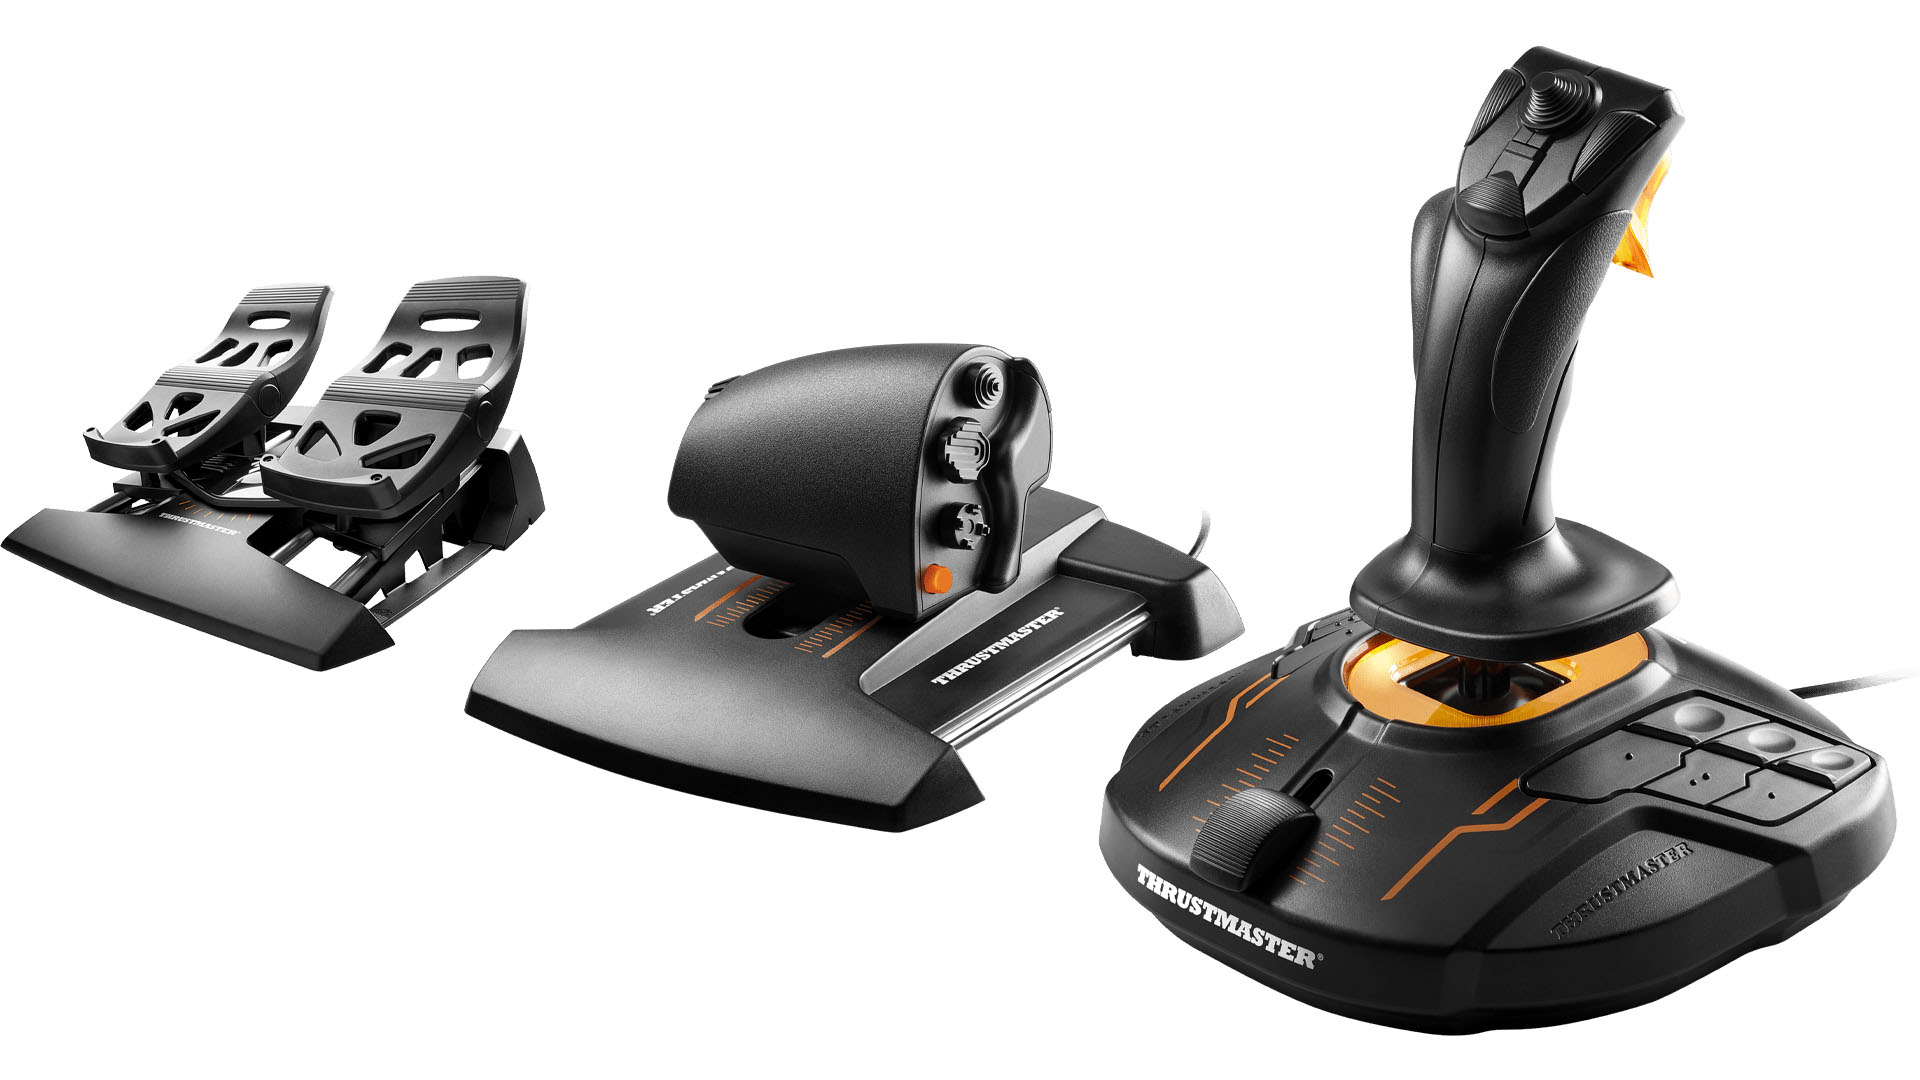
The first thing you should aim to buy is a flight stick. The basic model I recommend is the Thrustmaster T.16000M FCS, which is rather affordable at $80 and has everything you need, including a small throttle and a twist feature to control the rudder.
If you believe that you’d like to lean toward airliners in the future, an excellent alternative is the TCA Sidestick Airbus Edition, which costs 10 bucks more but reproduces the sidestick of an Airbus A320.
If you’re willing to spend a bit more, you can get the same sticks in combination with a throttle quadrant. The T.16000M FCS HOTAS or the TCA Officer Pack Airus Edition.
At $170 and $200 respectively, they’re a good investment for budding flight simmers. It’s worth mentioning that both throttle quadrants are sold separately if you’d rather get the stick first and then the throttle later. Of course, you’ll spend a bit more. The price difference is justified by the fact that the Airbus version lets you control the power of two engines separately.
The next step in your investment to improve your immersion and hone your skills should be rudder pedals. The affordable option is Thrustmaster’s T-Flight Rudder Pedals, at $130. You can also find them bundled with the T.16000M FCS HOTAS as the T.16000M FCS Flight Pack at $270. This last option is likely the best bang for your buck if you’re ok with a sizable investment upfront while saving money.
And if you’re wondering, no. Thrustmaster isn’t sponsoring this article. Their equipment is just my preference in terms of the balance between quality and price.
That being said, the rudder pedals aren’t the best you’ll find in terms of quality due to their construction being almost entirely in plastic. If you want something sturdier and better, you could look at the Honeycomb Charlie Rudder Pedals, although at $350, the jump in price is significant.
Once you have a stick, a throttle quadrant, and pedals, your setup is pretty much complete. You could consider a yoke if you fly aircraft that are controlled with it instead of a stick, but we’re definitely getting into advanced territory with that.
That’s it for today. We hope that you will enjoy flying over the Jurassic World: Archipelago, and that it helps you realize how awesome flight simulation is. Welcome to this fantastic hobby!
Microsoft Flight Simulator 2024 is available for PC and Xbox Series X|S (although Jurassic World:. Archipelago is available only for PC, at the moment. It’ll come to Xbox at a later date). If you’d like to learn more, you can check out our recent interview with Head of Microsoft Flight Simulator Jorg Neumann.
If you’d like to read the most recent flight simulation news, you can find plenty in our latest roundup article from yesterday.
If you want to go further back, we have a handy overview video of the major flight simulation news in the past week. You can watch it below. As usual, leaving a like and a comment and subscribing to our growing YouTube channel is extremely helpful.
While Simulation Daily is owned and financed by Orbx Simulation Systems, its staff is afforded full editorial independence and will strive to cover products from all companies and developers impartially. Check out our editorial policy.


